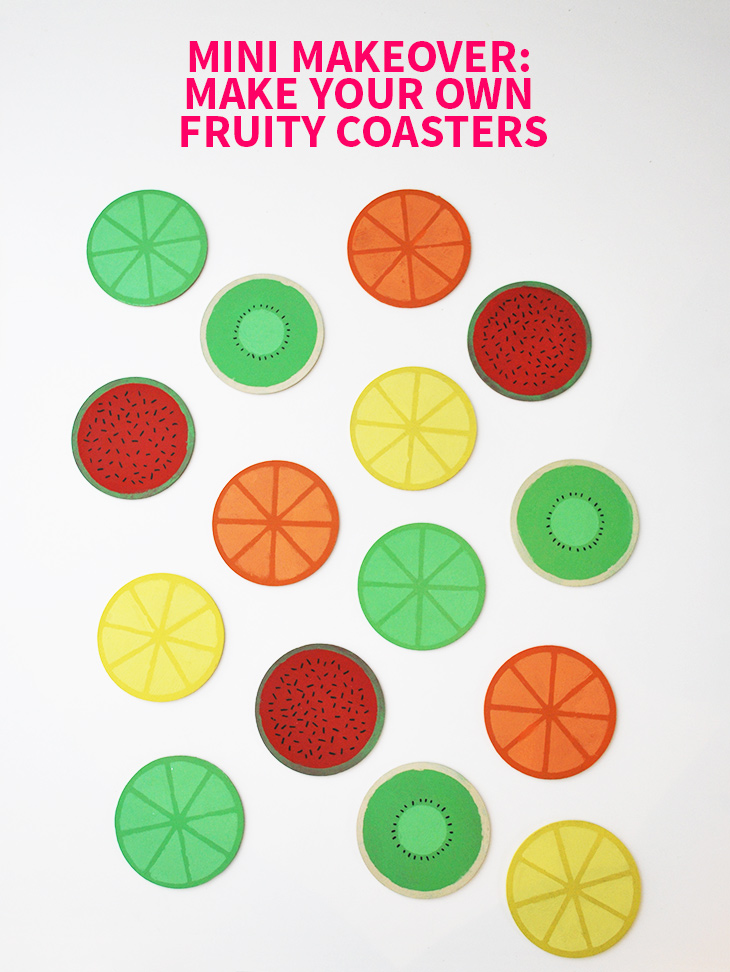
Now that I’ve revealed my tutti fruity party theme, I thought I’d share one of the projects I’m doing for the party! Yay crafting! One simple way to add to a fruity theme is to make some fruity coasters. They’re fun to make and pretty straight forward! This tutorial includes instructions for Lemons, Limes, Oranges, Kiwi Fruit and Watermelons. It’s helping this wintery week feel a little more summery! Here’s how to!
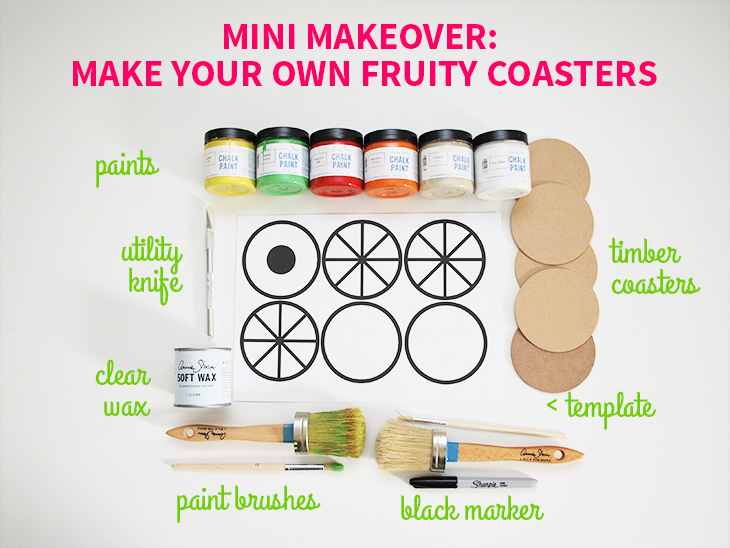
What you’ll need:
- Paints – Yellow, Green, Red (or Magenta Pink), Orange, Tan (this is Country Grey or Brown) and White I’m using Annie Sloan Chalk Paint that was left over from this post
- 9 cm Timber Coasters – I made 3 of each fruit so I needed 15 coasters. Bought at Bunnings Warehouse
- Utility Knife – For cutting out the template
- Template – Here’s the template I’ve made, best printed on 200+gsm paper. Download it here
- Clear Wax – If you’re using Chalk Paint you might like to use the wax sealant too. Clear sealant would work for other paints
- Paint Brushes – I needed a few in different sizes
- Black Marker – A Sharpie is good for this job. Could use black paint but this is less messy
- Not Pictured: Small Containers – for mixing paint colours

How to for Lemons:
- Print out your template on 200+gsm paper and get your utility knife ready. On a cutting mat, cut out each of the pieces. You Will have one for Kiwi Fruit, one for your Lemons, one for your Limes, one for your Oranges and one for your Watermelon (with an extra spare).
- Separate the parts you no longer need and keep the pieces as shown in this step. Place all to one side.
- For this project we will use yellow and white paint. Prepare your area and have the yellow paint and brushes ready to go.
- Paint all your Lemon coasters yellow with a large paint brush and don’t forget to cover the sides too. Leave to dry.
- In a small container, mix some yellow and white paint until you get a light lemony yellow colour.
- Once your coasters are dry place the lemon template on top of one and align it so that it’s in the centre.
- Holding your template on, with a smaller brush – start to paint the lemon pieces with the lighter colour. Keep painting until complete.
- Remove the template carefully and leave to dry fully. Repeat for all coasters.
- After some time you can cover the finished coasters in soft wax or a clear sealant so that they are protected from glass ring marks and leave to set. Repeat for all coasters.
- Now your lemon coasters are ready!! Yay!
How to for Limes:
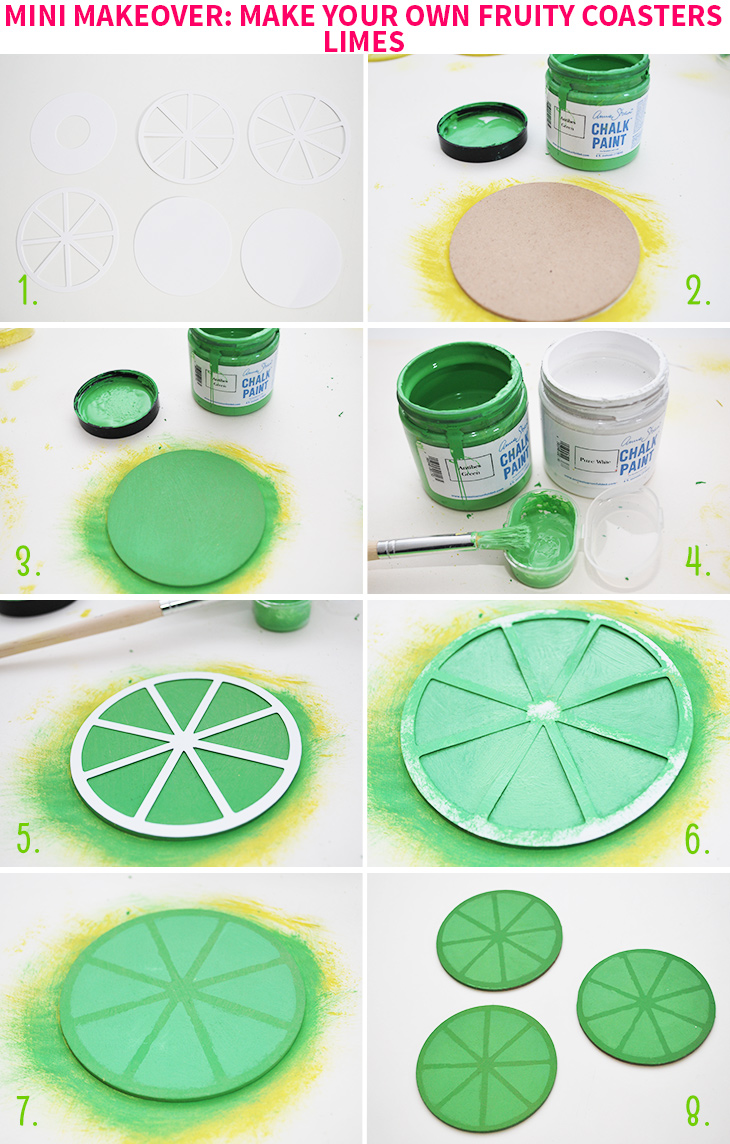
- Take the lime template that you cut out in the lemon tutorial and place to one side. If you haven’t already done so, follow step 1 of the lemon tutorial.
- For this project we will use green and white paint. Prepare your area (if you haven’t already) and have the green paint and brushes ready to go.
- Paint all your lime coasters green with a large paint brush and don’t forget to cover the sides too. Leave to dry.
- In a small container, mix some green and white paint until you get a light green colour.
- Once your coasters are dry place the lime template on top of one and align it so that it’s in the centre.
- Holding your template on, with a smaller brush – start to paint the lime pieces with the lighter colour. Keep painting until complete.
- Remove the template carefully and leave to dry fully. After some time you can cover the finished coasters in soft wax or a clear sealant so that they are protected from glass ring marks and leave to set (as shown in step 9 of the lemon tutorial). Repeat for all coasters.
- Now your lime coasters are ready to go!
How to for Kiwi Fruit:
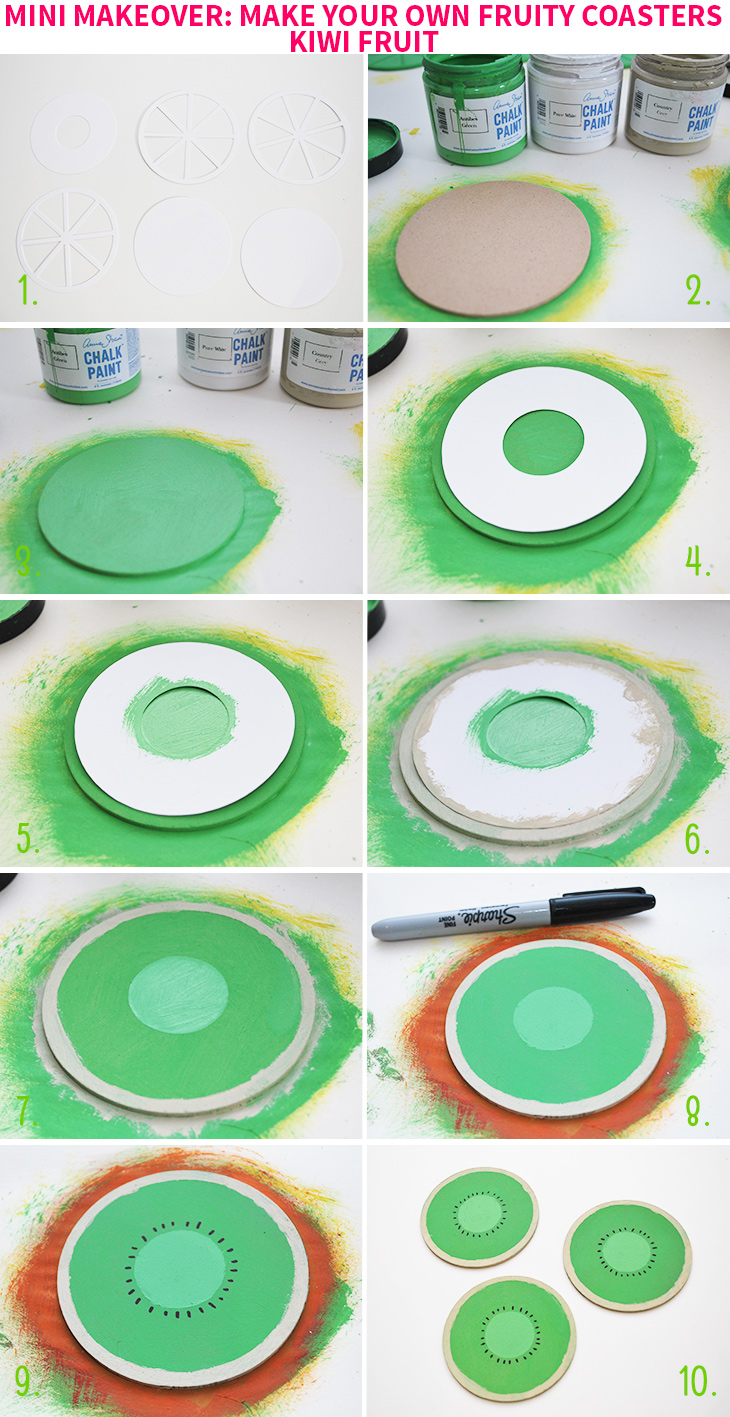
- Take the circle template with the hole in the middle that you cut out in the lemon tutorial and place to one side. If you haven’t already done so, follow step 1 of the lemon tutorial.
- For this project we will use green, white and country grey/tan/brown paint and a black marker. Prepare your area (if you haven’t already) and have the green paint and brushes ready to go.
- Paint all your kiwi fruit coasters green with a large paint brush and don’t forget to cover the sides too. Leave to dry. While you’re waiting either: mix some green and white paint in a small container until you get a light green colour, or use the left over light green paint from the lime tutorial above.
- Once your coasters are dry place the kiwi fruit template on top of one and align it so that it’s in the centre.
- Holding your template on, with a smaller brush – start to paint the kiwi centre circle with the lighter green colour. Keep painting until complete.
- Then with an even smaller brush, paint the outside top edge and sides in the country grey/tan/brown colour and keep painting until complete.
- Remove the template carefully and leave to dry fully. Repeat for all coasters.
- Once fully dry make sure the surface of the coaster is clean and get your black marker ready.
- Mark little lines around the lighter green circle as shown to make the little pips. After some time you can cover the finished coasters in soft wax or a clear sealant so that they are protected from glass ring marks and leave to set (as shown in step 9 of the lemon tutorial). Repeat for all coasters.
- Now your super cute kiwi fruit coasters are ready to go!!
How to for Watermelon:
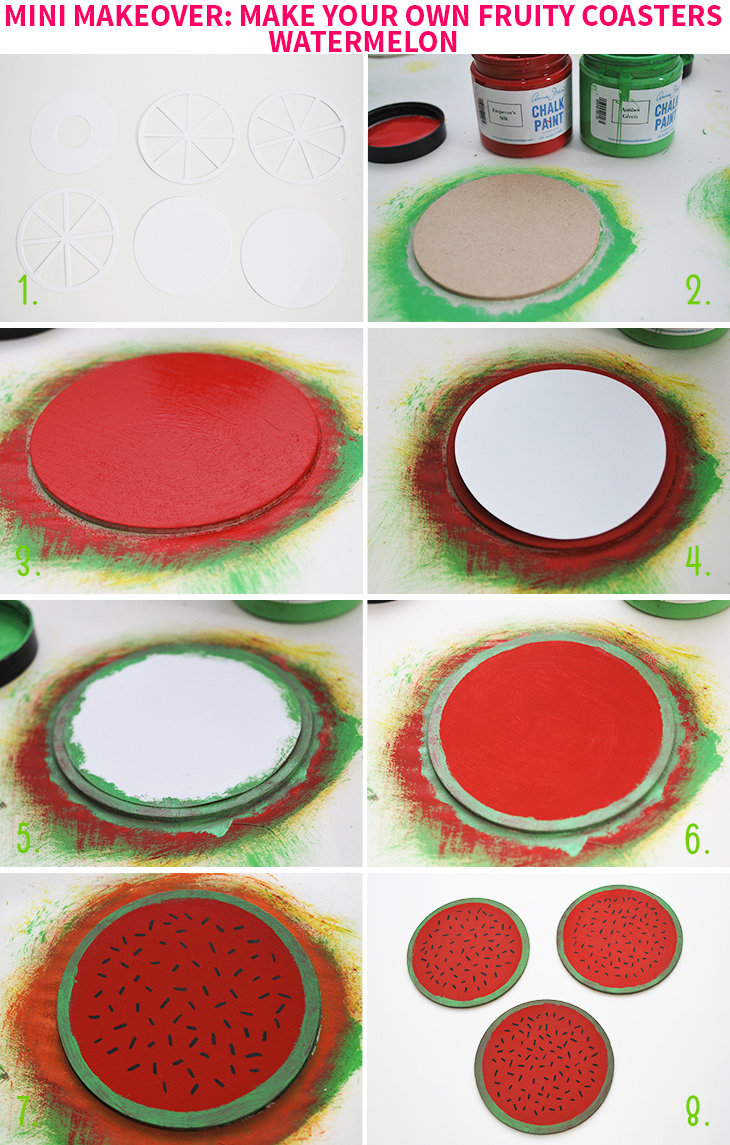
- Take the circle template without the hole in the middle (there is a spare for this one just in case) that you cut out in the lemon tutorial and place to one side. If you haven’t already done so, follow step 1 of the lemon tutorial.
- For this project we will use red (or a magenta pink) and green paint and a black marker. Prepare your area (if you haven’t already) and have the red paint and brushes ready to go.
- Paint all your watermelon coasters red with a large paint brush and don’t forget to cover the sides too. Leave to dry.
- Once your coasters are dry place the watermelon template on top of one and align it so that it’s in the centre.
- Holding your template on, with a very small brush paint the outside top edge and sides. Keep painting until complete.
- Remove the template carefully and leave to dry fully. Repeat for all coasters.
- Once fully dry make sure the surface of the coaster is clean and get your black marker ready. Mark little lines in a pattern inside the red circle as shown to make the little pips. Leave some space in red near the green edge where there are traditionally no pips. After some time you can cover the finished coasters in soft wax or a clear sealant so that they are protected from glass ring marks and leave to set (as shown in step 9 of the lemon tutorial). Repeat for all coasters.
- Now your watermelon coasters are ready! Hurrah!
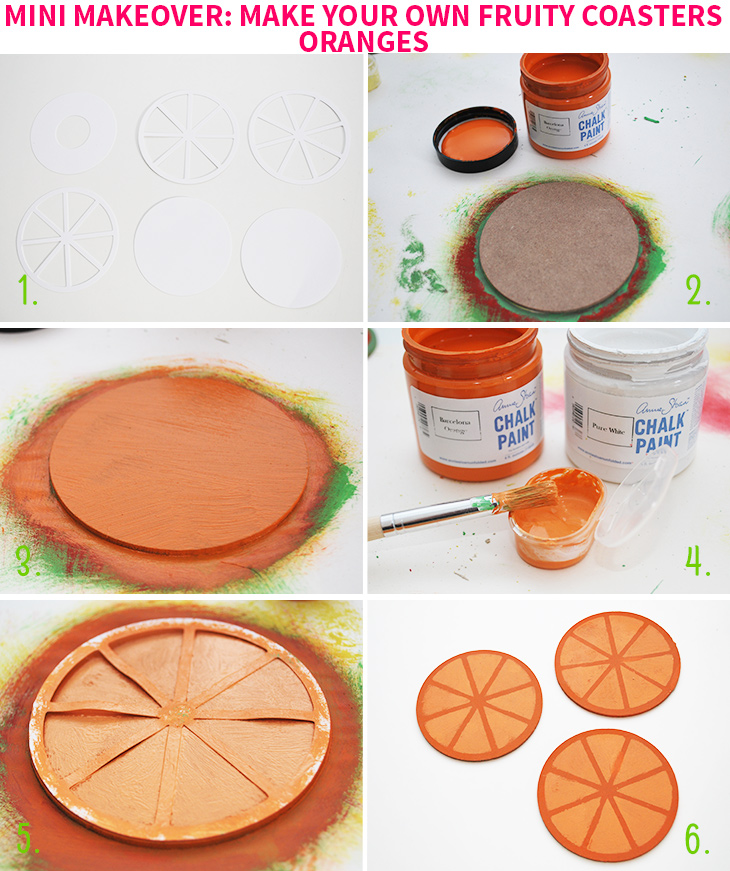
- Take the orange template that you cut out in the lemon tutorial and place to one side. If you haven’t already done so, follow step 1 of the lemon tutorial.
- For this project we will use orange and white paint. Prepare your area (if you haven’t already) and have the orange paint and brushes ready to go.
- Paint all your orange coasters orange with a large paint brush and don’t forget to cover the sides too. Leave to dry.
- In a small container, mix some orange and white paint until you get a light orange/apricot-like colour.
- Once your coasters are dry place the orange template on top of one and align it so that it’s in the centre. Holding your template on, with a smaller brush – start to paint the orange pieces with the lighter colour. Keep painting until complete. Remove the template carefully and leave to dry fully. After some time you can cover the finished coasters in soft wax or a clear sealant so that they are protected from glass ring marks and leave to set (as shown in step 9 of the lemon tutorial). Repeat for all coasters.
- Now your orange coasters are ready to go!!
Thoughts on the project:
These were super fun to make and make for a great rainy day activity (for tweens and up). Because I used Chalk Paint they dried really quickly and I was able to keep painting without too much waiting time. I did these tutorials in this order so that I could use the green paint most effectively as it’s in quite a few of the coasters. I felt that they came out a little darker than I was anticipating but they seem lighter the next day. If I did want them lighter/brighter, I would consider first painting all the coasters white as a base layer so that the colours really popped!
I think that a clear sealant is important for these to be functional, even if it can be a bit cumbersome to apply. I love the variety of the fruits that I picked and can’t wait to see how these look on the tutti fruity party table on party day! These would even make a great handmade gift if you’re looking for something fun to give.
Do you like fruity themed things? Would you try these coasters?
If you do try this, I’d love to see a photo or hear about how it went! Tweet me your pics at: @danniellecresp or instagram me at: @dannielle with the hashtag: #styleforahappyhome
Note: The paints I used are left over from a sponsored post I did last year. This post isn’t sponsored in any way, I just like to use what I have at home as it saves on costs and helps keep this blog going. D x