As part of the birthday party-in-a-box that I sent out earlier this month I wanted to make a gift that everyone could keep. My little present to them to say thank you. I put my thinking cap on and decided that coasters would be the perfect ‘home’ gift from a happy home blog. I first found the idea here, but as I couldn’t find many of the materials they used easily and affordably in Australia, including the cork roll, I decided to adapt their idea and make my own that’s easier to make here. Here’s how to make your own cork coasters!

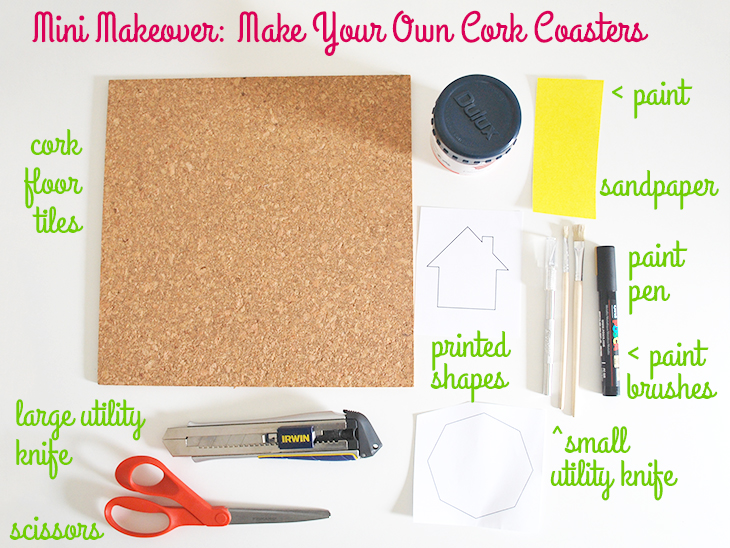
What you’ll need:
- Cork Floor Tiles I got these in a pack of 6 from Bunnings for $13.50. They are 305 x 305 x 6mm (12 x 12 x 0.23″). I chose these for their thickness and that they are widely available
- Large Utility Knife This is an Irwin 25mm Pro Touch Snap Off Utility Knife from Bunnings $19.98
- Sample Paint Pot I got Dulux Silk in White from Bunnings for $10.50 for 250ml (This was pricey as I only used a tiny amount, but will be available for future projects. If you have white house paint at home you could use that)
- Sandpaper I had a heap of this left over from previous projects, also from Bunnings but not sure of the price (I think it was around $1 a sheet at max)
- Printed Shapes – I made these in Photoshop and printed and cut them out on regular printer paper (for the octagon) and 200gsm paper (for the house) You could draw these or use any program that has shapes
- Paint Brushes I got these from Officeworks in a 10 pack of assorted brushes for $4.97. I used a #4 brush and a #12 brush
- Paint Pen I got this from Officeworks in Gold for $6.13. I only used a tiny bit of the pen so it will be used again in future projects
- Small Utility Knife I’ve had this for a long time, but I purchased it from Riot Art and Craft for around $11
- Scissors I got these from Officeworks for $19.98 and have used them on many projects. A good pair of scissors are a great asset
- Not pictured: Protective Surface to Cut On like MDF and/or Cutting Mat For protecting your work surface. I used a 900 x 600 x 3 mm MDF sheet from Bunnings $2.33
- Optional: Double sided Removable Poster Tape For sticking the printed shapes to the cork

How to:
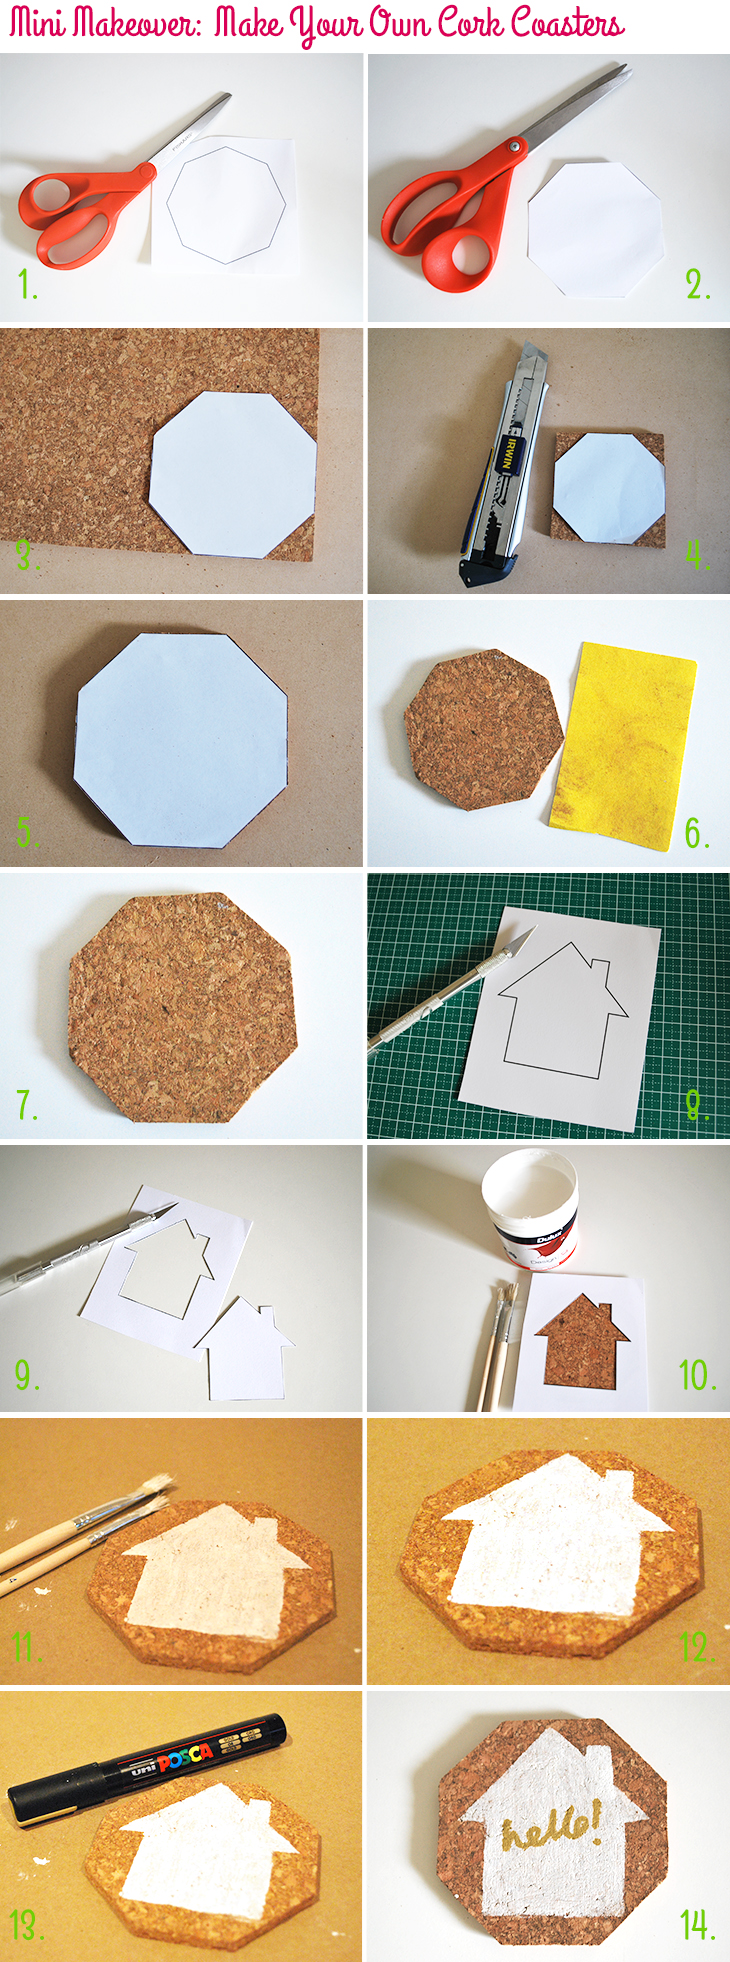
- Start by making your shape for the coasters in Photoshop/ other computer program that allows shapes and print it, or draw it on a piece of paper if you prefer, and get it ready for cutting My template was 9.5cm x 9.5cm (3.75in x 3.75in) which makes 9 coasters per sheet
- Cut out your shape I chose an octagon and prepare your work surface by placing down your MDF sheet or cutting mat on a flat, steady surface that you can work on
- Take your cork tile and lay it on the cutting surface you just prepared. Add your cut out shape for the first coaster to the bottom corner of your cork sheet (add double sided tape to keep it in place), I’m left handed so I used the bottom right corner, but if you’re right handed you may prefer to work from the bottom left corner
- With the large utility knife cut two straight lines. One horizontally at the top of the octagon (or your shape) and one vertically at the side that’s attached In my case the left. This will make a small square for you to work with. Note: to cut through the cork it’s best to do small, repeated lines with the utility knife with some pressure, but not so much it hurts your arm. I found that repeating the same action through the cork 8 times was enough for it to break away cleanly
- Now cut those extra corners to make your shape using the cutting method mentioned above – take your time with it as it can feel like a work out on your arms if you try to cut through too much in one go
- Next it’s time to take the template off and sand the edges because it’s cork some of it will crumble in this process, it can get a little messy
- Now you have your cork coaster cut out and it’s time to decorate it
- Choose a shape that you would like painted on your coasters, I chose a home that I drew in photoshop, either create it on the computer or draw it on some paper. I chose 200gsm paper for this as it’s just that but thicker and more sturdy. Cut around the shape with quite a large border around each side. Place it on a cutting mat (or the MDF if you prefer) and carefully cut the inner shape out using the small utility knife
- Once you have cut it out place the inner piece to one side as you need the outer piece for the next steps
- Next prepare your paint and brushes and line your template shape up on the coaster (add double sided tape to the back to keep it in place) Note: this picture isn’t shown on MDF, but there should be a protective surface if you don’t want stray paint on your tabletop – see next step
- Slowly start to paint your image (with the template still on – not pictured). I started in the middle with the bigger brush and then did the smaller corners with the small brush. Take your time with this as it can take a bit to work out how much paint you need on the brush
- Pull the template off carefully and neaten any edges carefully by scraping with the small utility knife if you need to. Leave to dry completely.
- Take the paint pen and prepare it as per the instructions on the outside. Use a test piece of paper to make sure it’s flowing properly before using it on your cork coaster. Also work out what word, image or phrase you want to add to yours. I really struggled with what to write on mine, but in the end I chose hello as it’s welcoming. Practice your handwriting if needed. Then write on your cork coaster and leave to dry
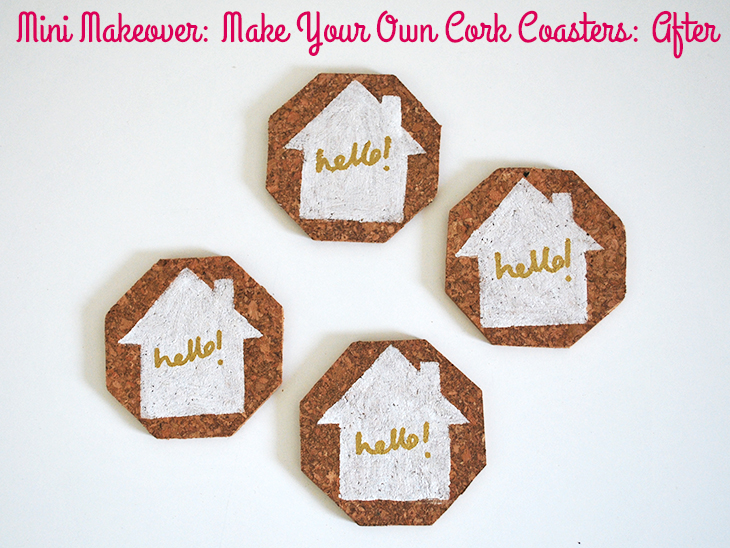
- Ta-da! Your cork coaster is ready! Repeat for as many as you’re going to make!

Thoughts on the project:
These were a lot of fun to make. In the end I made 24 with two that were for practice, two for me and two each for the other 10 party-in-a-box kits. 24 felt a bit over the top, but they did turn out really fun. I like that in going with the thicker cork tiles that they protect my desk from my hot cup of tea and that I made them large enough for even my mega US cup to sit on.
Initially I wanted to make the wording as negative space with the cork, but it was just too tricky and in the end the thick gold paint pen was a much better option. I love that these are useful gifts and were something more than just party stuff that won’t really last all that long. They are also pretty versatile in terms of design ideas as you could easily make these for Christmas or Easter just by changing what you paint on the coasters.
Mine are already getting a lot of use and are a nice reminder of the other people who also have them too.
Do you use coasters in your home? Would you make some?
If you do try this, I’d love to see a photo or hear about how it went! Tweet me your pics at: @danniellecresp or instagram me at: @dannielle with the hashtag: #styleforahappyhome