Happy New Year! This year I’m having a different theme each month here on Style for a Happy Home to get you thinking about all the different elements that can make your home feel happier! I wanted to kick this month off with the return of the mini makeover, with one that I’ve been itching to share with you for a while! Woohoo!!
With it being summer here, I realised that I don’t spend enough time enjoying my back yard and just spending a little (sun-smart) time in the sunshine, so I decided it was high time I got my lawn furniture ready to enjoy! I know it’s not summer everywhere, but I hope you folks in the northern hemisphere will get some ideas for how to enjoy your summer when it arrives!
What you’ll need:
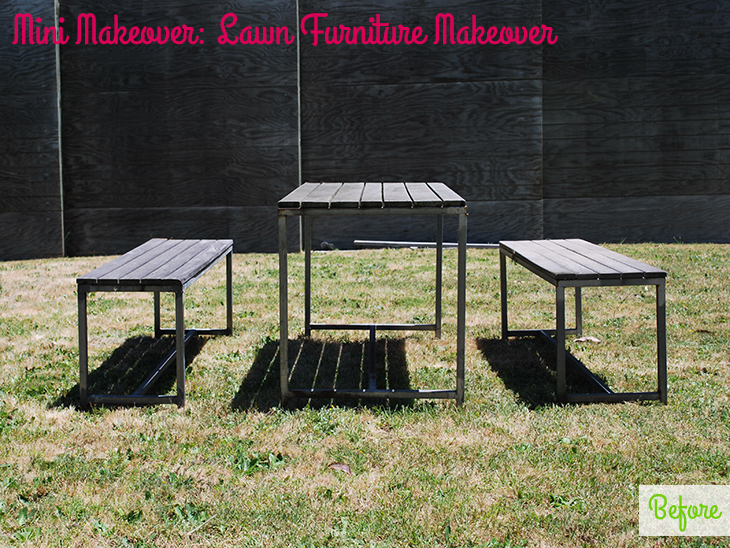
- Old lawn furniture that needs a little TLC Mine was salvaged from an old pub about 8 years ago
- Spray paint in your choice of colours I needed 5 cans in gloss orange Rustoleum from Bunnings was $10.95 a can, Super Gloss from Masters was $12.27 a can (but were purchased with my gift card)
- Painting Clothes and gloves So you don’t ruin your good clothes. A face mask might be a good idea too
- A Drop Sheet or somewhere you don’t mind getting covered in spray paint I tried a drop sheet at first, but I found the grass was just fine
- Sand paper for roughing up the metal and the timber
- Frog Tape for your edges
- Good Weather or somewhere free from rain and wind
- Sun Protection I may have remembered this the hard way
- Your mini makeover essentials
This was my biggest DIY to date, so I was a little worried that it wouldn’t turn out the way I wanted it to. My lawn furniture was salvaged about 8 years ago and I never got around to actually using it. My grandmother borrowed the table so my first step in the DIY was getting all the pieces in the one location. My brother helped me move it with his work Ute (pick up) and then I had to wait for the weather to co-operate. It’s been a super rainy start to summer here, so I had a few false starts.
I realised quickly that there had been some rusting of the metal so I went to Bunnings to get some Rustoleum brand spray paint, as the orange that I had from Masters didn’t have the rust primer. I didn’t know before going that you can get the Rustoleum with the paint colours mixed in, so I grabbed the orange that was the same shade as the two cans I had from Masters. I should have bought 2 or 3 cans that day as I ended up having to go back!
Here’s how you do it:
First make sure you have sunscreen on, even if it’s not a hot day, and your painting clothes. Start by using the sand paper and roughing up all the metal that you will paint. Scrape any loose rust off. I recommend doing them all before you start painting any of them, so you don’t forget this step.
Then take the frog tape and cover the edges of the timber where they meet the metal, if you’re not also painting that the same colour. You can also use the frog tape if you’re doing patterns.
Make sure you have your rubber gloves on and shake up your first can for the recommended 1 minute before you start spraying. Read the instructions on how to use it and how to test it on your metal surface. I started with the table and flipped it upside down. Give it an even spray and get used to controlling the nozzle. I used the Rustoleum brand first so it covered the rust parts and protected it, waited the recommended time and then used the Super Gloss as the second coat. The Table took nearly two whole cans on it’s own, so be aware that you might need a few – depending on the size of your project.
Once it’s dried you’ll need to flip it up the correct way and make sure that there aren’t any spots that you may have missed. Touch up those spots where needed, but try not to use a near empty can, as they can leave splutter marks (as I may have learnt the hard way ;) ) that you’ll need to touch up again!
Make sure to take food and drink breaks and preferably spread it out over the weekend if you can. It’s tiring work and the paint fumes can get too much.
Once you’re ready, you can tackle the stools (or chairs if you have them). This time I did the base coat for both of the stools first before moving on to a top coat. Because I had the two different brands I again used the one with the rust protection first and then used the other as the top coat. It was a bit risky using the two different brands, so if you are starting from scratch and didn’t pick your paint before checking you could use it (like I did) you should probably stick to the one brand. You can get the Rustoleum as a primer only (an undercoat) and then use your paint as a top coat too.
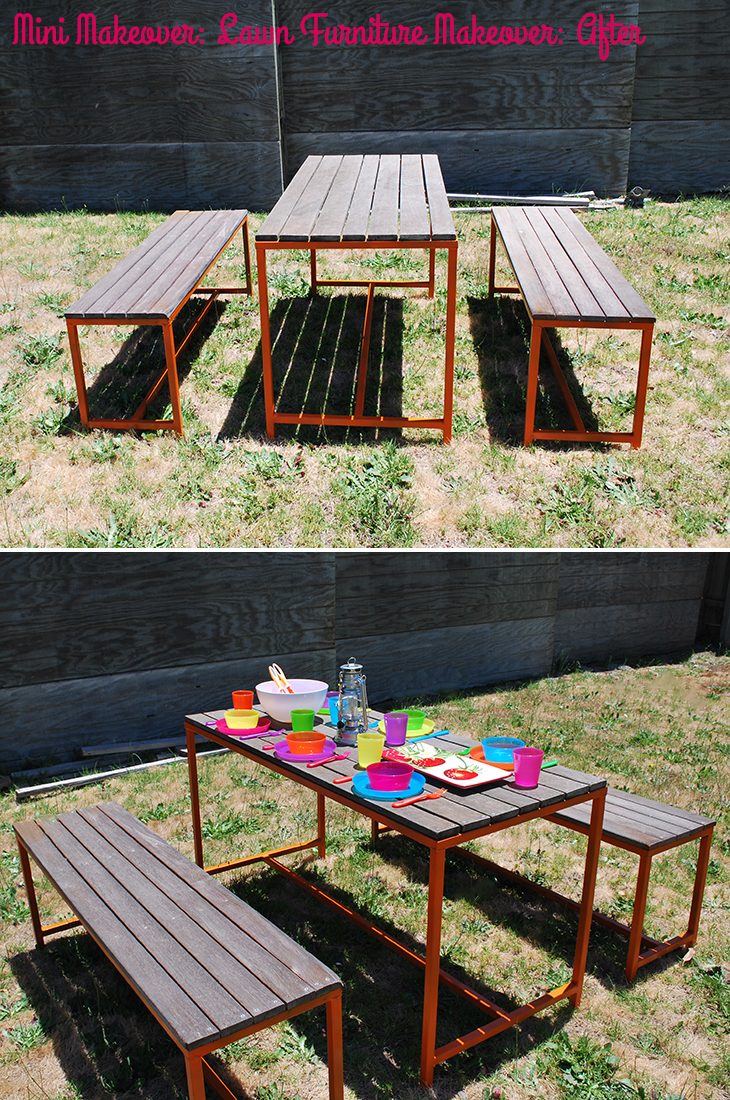
Once they’re dry and have been checked on all sides that you haven’t missed any spots, you can either varnish and sand the timber on the top or leave it for a more rustic feel. I gave mine a quick rub over with the sand paper and left it be. I decided that I want it to be able to get mess on in and live out in the elements, so I wasn’t too worried about it looking picture perfect.
Thoughts on the project:
This is one that I’m glad that I took my time with. Because it was so old, I couldn’t get the timber slats off it to paint the frames separately. That worked just fine for me, but it might be something that you would consider doing. I think it’s good to stop and think about how it will be used before you start, I want it to get used a lot and for it to be enjoyed. I love how bright it turned out and for once I look forward to inviting people over for a meal, as there’s somewhere we can go and just enjoy the space.
I got myself covered in paint because I forgot my gloves, and I got pretty badly sunburnt because I didn’t realise how warm the sun was getting with the sea breeze keeping me cool. Both were amateur mistakes I now know not to repeat and hopefully you can skip those silly lessons too! ;) I also found that the nozzle on the Rustoleum brand cans were easier on my girly hands and didn’t take as much pressure as the Super Gloss, which I found wouldn’t always come out of the can without me using two hands. I love that the spray paint meant no brush marks and any of the imperfections I see were all from me giving this really ambitious (for me) project a go!
This took quite a bit of planning and I’m so glad that it turned out even better than I had hoped. The Orange turned out much more vibrant than I had anticipated but seeing the bright colour makes it so much more inviting to sit at and just be in the back yard. I didn’t anticipate just how much difference the colour makes, but now I can’t wait to stop work and eat my lunch out here, spend some time reading a good book and making some fun memories in a much happier back yard space. I love it when things you think of actually turn out the way you’d hoped.
Have you ever tried something like this? Do you have somewhere to hang out outside in the summer? I’d love to know, share with me in the comments!
If you do try this, I’d love to see a photo or hear about how it went! Tweet me your pics at: @danniellecresp or instagram me at: @dannielle with the hashtag: #styleforahappyhome
P.S. My back yard is on a weird shaped rise so the straight lines on the fence don’t look straight ;)
This looks SO great Dannielle! Love the colour you chose – happy and bright and perfectly Summery!
Thanks so much, Emily! I’m looking forward to spending much more time outside and putting it to good use! :)