Today I wanted to share with you a fun tutorial on how to make your own fruit garlands. I was feeling a bit gloomy (to match the weather) and I wanted something simple and fun to make and this popped into my head. I’ve chosen kiwi fruit and strawberries for this tutorial as they are two of my favourite fruit treats! The kiwi-strawberry Snapple is my favourite drink to treat myself with when I’m visiting the US. So fruity and delicious! Here’s how to make some for your home!

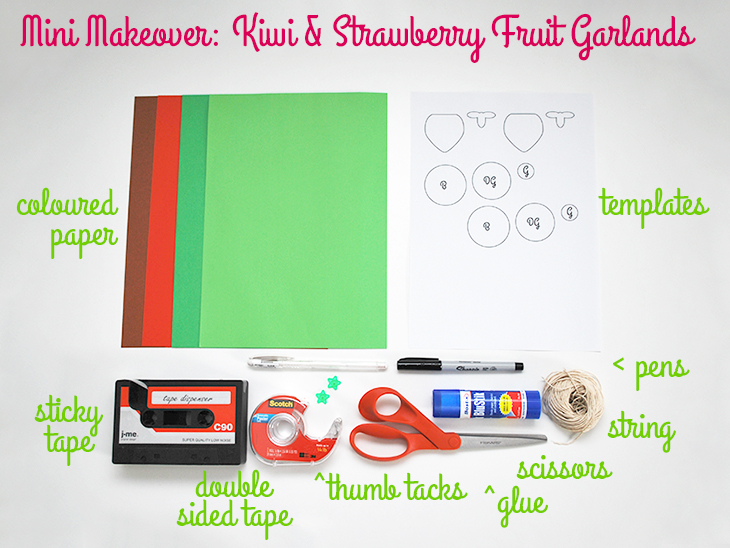
What you’ll need:
- Coloured Paper Brown, Dark Green, Light Green and Red I recommend a cardstock or heavy weight paper as the light stuff bends too easily. Mine were from a scrapbooking store from around 10 years ago. Light green paper was from KMart (not recommended as it wasn’t a cardstock)
- Templates for the fruit I designed and made them. You can download them here (please don’t redistribute) right click to download.
- Pens A black thin tip sharpie and a white gel pen
- Sticky Tape
- Double Sided Removable Poster Tape
- Thumb Tacks
- Glue
- Scissors
- String

How to for the Kiwi Fruit:
- Cut out the template for the 3 kiwi circles. The B is for Brown, DG for Dark Green and G for Light Green. Take a small amount of removable poster tape and attach it to the back of the B circle. Place it over the brown paper. Try to put it as close to the edges as possible so you don’t have wasted paper.
- Cut around the B template to make the brown circle. Carefully remove the template and repeat 7 more times to make an 8 fruit garland.
- Take the DG template and some dark green paper. Take a small amount of removable poster tape and attach it to the back of the DG circle and place it over the dark green paper and affix with the tape. Remember to keep close to the edges of the paper where possible.
- Cut around the DG template to make the dark green circle. Carefully remove the template and repeat 7 more times to make an 8 fruit garland.
- Now take the G template and some light green paper. I didn’t have any cardstock in this colour so I used a lighter paper and it was a bit flimsy. The thicker cardstock adds to the sturdiness. Take a small amount of removable poster tape and attach it to the back of the G circle and place it over the light green paper and affix with the tape.
- Cut around the G template to make the light green circle. Carefully remove the template and repeat 7 more times to make an 8 fruit garland. If your hands are tired from cutting you might want to take a break here. Now you have all the pieces for your kiwi fruits!
- Now it’s time to layer and glue them. Place your dark green circle face up (in case there are mistakes on one side) and place the light green one face down. Take your glue and add it to the back of the light green circle. Now place the glue side down in the centre of the dark green circle. Then, flip the dark green circle over and add glue to the back of it and with the glue side down add it to the centre of the brown circle.
- Place your ‘kiwi fruit’ on a flat surface and carefully press the layers together. I like to use the clean top of the glue lid rather than my fingers that might have residual glue on them. Repeat steps 7 & 8 for all 8 fruit pieces.
- Now it’s time to take a thin black sharpie and add the little pips. On the dark green circle, add some little lines around the light green circle spaced slightly apart and then repeat a second time slightly further out in between the first layer. The beauty of a kiwi fruit is that no two are ever exactly the same. See next step for an example. Repeat for all fruit pieces.
- Ta-da! You have your kiwi fruit pieces!
- Now line them up an even width apart and take some string and cut it to size. I cut this one 92 cm long.
- Then flip them upside down with the same width apart as before and get some sticky tape ready for all 8 pieces.
- Sticky tape the string to the pieces towards the top. Try to keep them the same distance from the top for all of them as they will hang better.
- Tie a knot in each end of the string.
- Add the thumb tack to the string and tighten the knot around it.
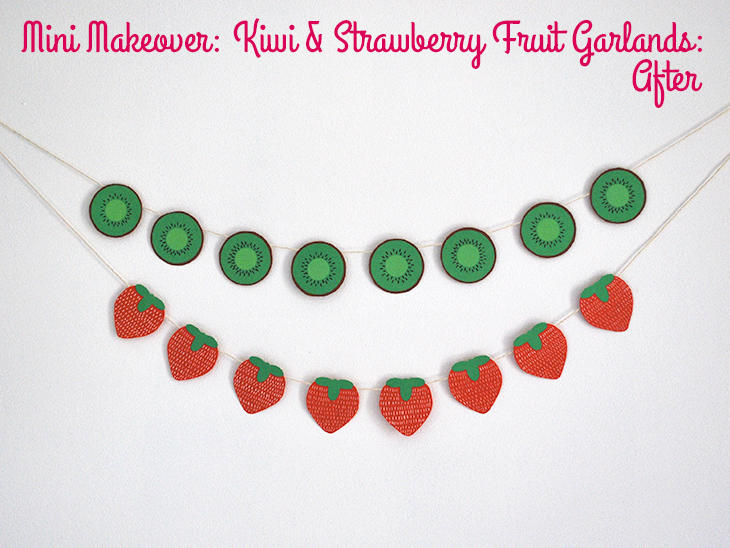
- Then hang your kiwi fruit garland! Ta-da!

How to for the Strawberries:
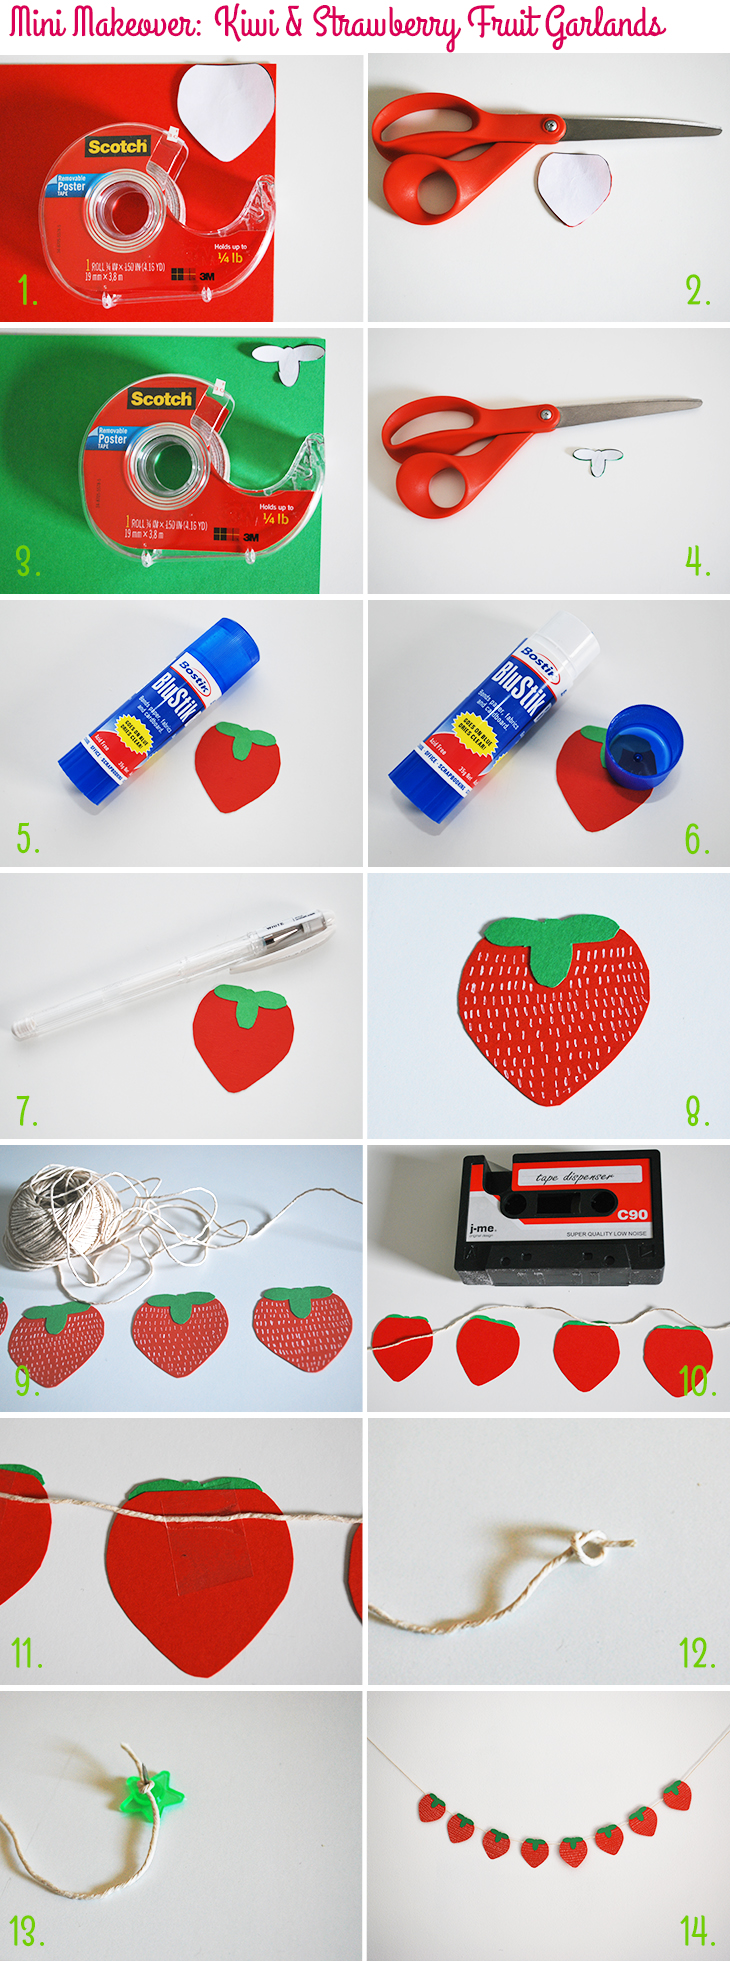
- Cut out the template for the strawberry top and bottom. Take a small amount of removable poster tape and attach it to the back of the bottom piece (the larger of the two). Place it over the red paper. Try to put it as close to the edges as possible so you don’t have wasted paper.
- Cut around the larger template to make the strawberry. Carefully remove the template and repeat 7 more times to make an 8 fruit garland.
- Take the small template and some dark green paper. Take a small amount of removable poster tape and attach it to the back of the top piece and place it over the dark green paper and affix with the tape. Remember to keep close to the edges of the paper where possible. This one you can use left over green paper scraps from old projects if you have any.
- Cut around the top piece template to make the leafy green top. Carefully remove the template and repeat 7 more times to make an 8 fruit garland. If your hands are tired from cutting you might want to take a break here. Now you have all the pieces for your strawberries!
- Now it’s time to glue the tops to the strawberries. Lay the larger piece face up and take the top piece and place it back down on the glue and add glue to the whole back side of the green piece. Then carefully place it over the top edge of the front of the strawberry with half of the top two leaves hanging over the edge. (see step 10 or 11 for an example)
- Rub over the top of the top piece to ensure that it’s stuck down. Be careful not to let the exposed bit stick to the table. I like to use the clean top of the glue lid rather than my fingers that might have residual glue on them. Repeat steps 5 & 6 for all 8 strawberries.
- Take your white gel pen and test it on a scrap piece of paper to make sure it’s working. Once it is, then take your strawberry piece and start adding small white lines to it. I started at the top and continued left to right all the way to the bottom leaving some space in between for the red to show through. You could do less lines than I did if you’d like more red space.
- Ta-da! You have your strawberries!
- Now line them up an even width apart and take some string and cut it to size. I cut this one 102 cm long (so that it would sit below the kiwi fruit).
- Then flip them upside down with the same width apart as before and get some sticky tape ready for all 8 pieces.
- Sticky tape the string to the pieces towards the top. Try to keep them the same distance from the top for all of them as they will hang better.
- Tie a knot in each end of the string.
- Add the thumb tack to the string and tighten the knot around it.
- Then hang your strawberry garland! Yay!

Thoughts on the project:
This was such a fun project to make. I really enjoy sitting and crafting and coming up with this was really fun. I am really enjoying all things fruity at the moment and this was great fun to make and hang in my home. I also love that they can be used for other things as well as a garland. You could write a sweet note on it and pop it in your child’s lunchbox or add it to a plain white card and gift it to someone or even just have them around the house to give you a smile.
It was pretty easy to do, though when you start making quite a few of them the time does pass quite quickly. It could be easy to spend half a day making them if you didn’t have a limit on how many you wanted to make. They’ll certainly cheer up my home for this last month of winter. Yay!
Do you have a favourite fruit? What should I try next?
If you do try this, I’d love to see a photo or hear about how it went! Tweet me your pics at: @danniellecresp or instagram me at: @dannielle with the hashtag: #styleforahappyhome
A good result for all that hard work.
Thanks, Claire x