Chalk Paint™ provided by Annie Sloan Unfolded Australia*
When I was approached recently to try out Chalk Paint™ by Annie Sloan, I’ll admit that I was a little bit reluctant. I’d only ever seen it used in a shabby chic way and that’s just not my style. But after attending their event at ProBlogger on the Gold Coast, I learnt that it doesn’t have to be done in that style and I was keen to give it a go! I wanted to try it on something that I would use in my home and didn’t already have so I decided I would make a serving set! Here’s how you can make one too!

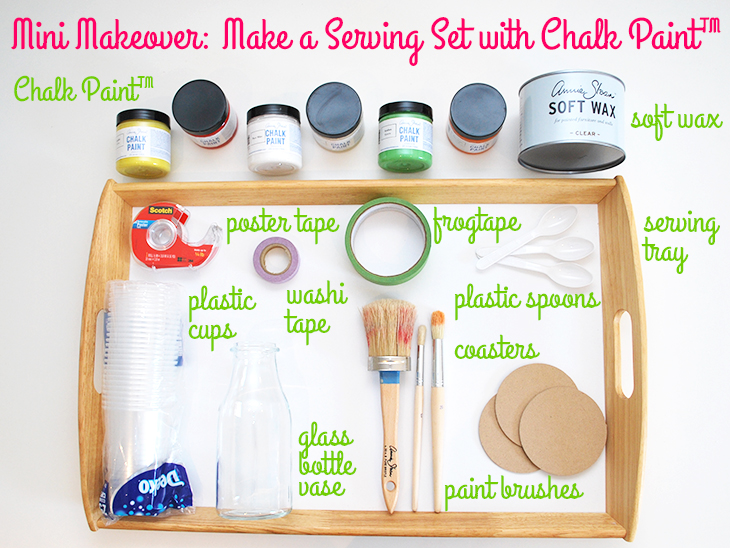
What you’ll need:
- Chalk Paint™ by Annie Sloan – I was gifted 4 colours for this tutorial and had 2 that were in the goodie bag at ProBlogger. I chose to use all 6 in this tutorial, because I love colour. The colours I’ve used are: Emperor’s Silk (red), Barcelona Orange, English Yellow, Pure White, Anitbes Green and Country Grey
- Annie Sloan Soft Wax – Clear – I was given this for this tutorial
- Serving Tray – I got this from IKEA
- Removable Poster Tape – From Officeworks
- Washi Tape – From my collection
- Frogtape – From Masters
- Plastic Teaspoons – From the supermarket
- Plastic Cups – From the supermarket
- Glass Bottle Vase – From IKEA
- Paint Brushes – I was gifted the Annie Sloan Brush for this tutorial, I received one in the goodie bag at ProBlogger. The other brushes are from a pack bought at Officeworks that I’ve had for ages.
- Coasters – From the Craft section at Bunnings
- Not Pictured: Butchers paper roll – for protecting your table when painting, from IKEA
- Not Pictured: A cloth – for wiping your brushes
The Coasters

How to:
- Prepare your area for painting by laying down some butchers paper and use a small amount of removable double sided tape to tape your coaster to your butchers paper so it doesn’t move whilst painting. Get your brush and washi tape ready and choose your paint. I chose Pure White Chalk Paint™ for my first layer on all coasters. Note: I taped the butchers paper to the desk with washi tape so it also wouldn’t move.
- After shaking the paint in the pot, you can use the paint in the lid at first to start painting your coaster. I found it helped me not get too much on the brush right away. Because I was painting so many things I chose a smaller brush and saved the Annie Sloan brush for the serving tray, but it can be used for this too.
- Cover the top with the paint and then be sure to go around the edges too. This is where having it stuck down really helps as you don’t have to hold the coaster whilst it’s covered in paint. Leave to dry.
- Once dry, which is pretty quick, add your washi tape over the part you want to protect from the next layer of paint. Space them how ever you like. Make sure that the edges are completely stuck down as that’s how you will get your straight lines.
- Optional Step for different colours: I wanted a deep pink rather than a red for one coaster, so I used a plastic cup and two plastic spoons. For this colour I did approximately 1/2 a teaspoon of Emperor’s Silk and just a dash of white (just the tip of the teaspoon and mixed well.
- Optional Step: test your colour on some paper before using it so you know you’re happy with it.
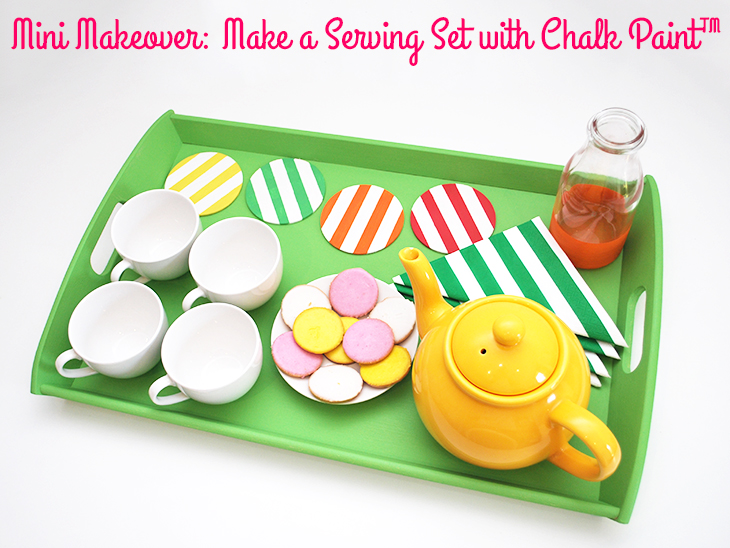
- Paint over the washi tape and the exposed white Chalk Paint™ and don’t forget the edges. Leave to dry. Note: I used this ‘pink’ as well as 3 other coasters that used English Yellow, Barcelona Orange, and Antibes Green in the same pattern. I only mixed for the ‘pink’ shown in this tutorial. See the final photo for all 4.
- Carefully pull the washi tape up and reveal your white colour that was underneath.
- Once all washi tape is removed carefully pull your coaster from the butchers paper and remove the double sided tape underneath
- Voila!
- Step not shown: add clear soft wax to the coaster tops to protect them by following the instructions on the tin
The Serving Tray

How to:
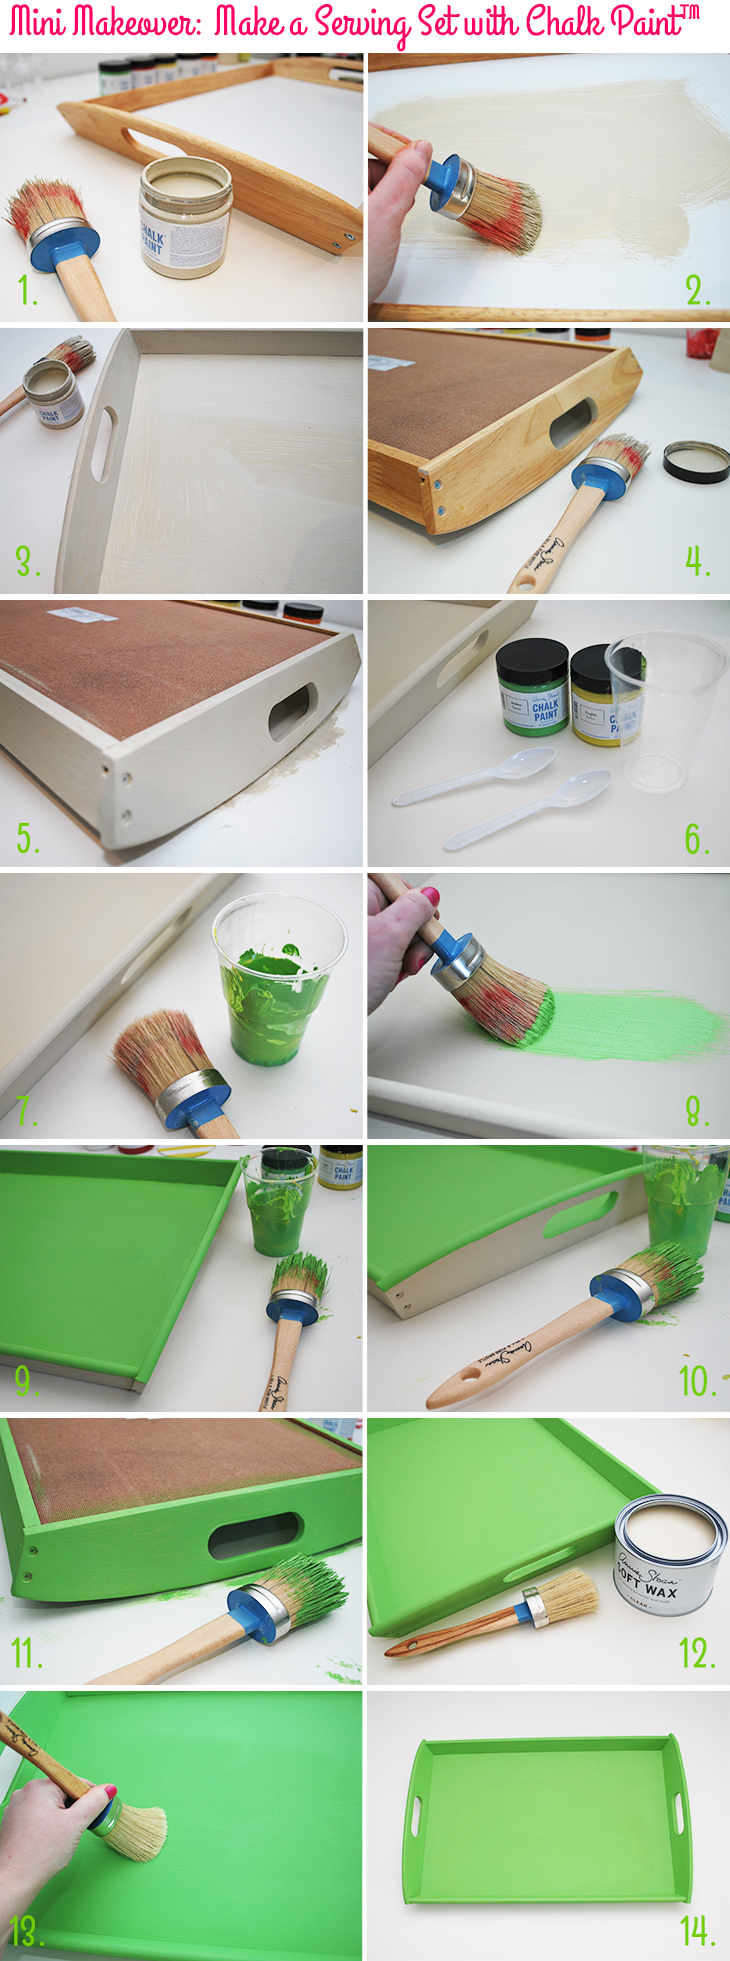
- Prepare your space for painting by putting butchers paper over your table. Take a clean Annie Sloan brush and a pot of Country Grey Chalk Paint™. Note: I chose to use the Country Grey paint as an undercoat as the sides of the tray were a different colour to the tray base. You don’t have to have an undercoat with Chalk Paint™, I just decided to.
- Start painting your tray. This brush allows you to do some big strokes and get a good feel for the paint. The brush strokes will look messy when wet but dry quite nicely.
- Continue painting until the tray and sides are all covered and leave to dry. I did two coats.
- Once it’s dry, Flip it over and paint the edges. On this tray I found the edges were much easier to paint than the white plastic base and was glad to have the undercoat.
- Make sure all the edges are covered and leave to dry.
- Now it’s time for your top coat colour. I wanted a lime green so I used a plastic cup and plastic spoons again, this time with Antibes Green and English Yellow. I initially did 3 full teaspoons of both colours (so 3 of green and 3 of yellow), but I needed to then mix another 3 of both to cover the tray fully twice. Mix them together with a small paintbrush and test the colour.
- Make sure your paintbrush is clean and doesn’t have any other paint still on it and get ready to start painting.
- As before, start paining in the middle and then work your way around to the sides. make sure to get in those corners as they can be a bit tricky with the bigger brush. It will go on a very bright green but will dry a bit darker.
- Once you’ve covered the top with two coats, leave to dry.
- Now it’s time to flip it over and paint the outsides. You can see the contrast between the two colours here.
- Paint around all of the outside with two coats and leave to dry.
- Once completely dry, you can prepare your space for applying the soft wax which protects the chalk paint from getting chipped.
- With a clean and dry paintbrush you can apply the soft wax as per the instructions on the tin. Note: Do it in a well ventilated area as it’s got a strong smell
- Ta-da! Your serving tray is ready to go!
The Glass Bottle Vase

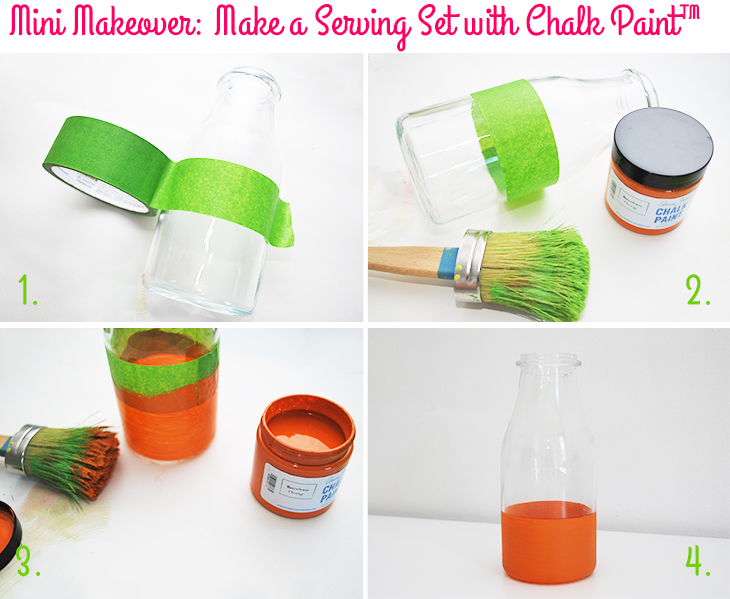
- Prepare your area by laying down some butchers paper and getting your frogtape ready. Start by wrapping the frogtape around the vase about half way down the vase, remembering that you will only paint what it below the frogtape. Try to line the tape up so it is the same distance from the bottom of the vase all the way around. Make sure that the frog tape edges are stuck down so you get a nice clean edge.
- Then take a clean and dry paint brush and carefully paint around the bottom end of the glass with the Barcelona Orange Chalk Paint™. Start anywhere on the side of the bottle.
- Once finished the sides you can leave it to dry. If you like you can also paint the base of the jar and leave it standing upside down to dry. Do a second coat if needed.
- Once it’s completely dry, remove the frogtape and voila! Your new vase/cute milk jug is ready to go.
- Optional step: add soft wax by following the instructions on the tin
Now you’re ready to have a tea party!!

Thoughts on the project:
I really enjoyed working with this paint. I’m not a confident brush painter (I prefer the more forgiving spray paints) so I was pleasantly surprised at how fun it was. I really liked how easy it was to come up with colours that were a little more ‘me’ than the traditional paint colours I was provided with. (They are excellent too, but you know how I love bright colours, especially bright green!) I felt like they let me put my ‘stamp’ on it.
The Chalk Paint™ is quite forgiving too, and you don’t have to stick to using the brush only in one direction and you can feel like it’s going to not look great and then it dries looking awesome! What I think I love best about this project is that they are things that I can use again and again! The vase might get a flower, and the serving tray was something that we didn’t own, but will definitely come in handy. And we don’t really have many coasters either so I’m sure they will get put to good use soon too!
Do you have a serving set? What would you have chosen to paint?
If you do try this, I’d love to see a photo or hear about how it went! Tweet me your pics at: @danniellecresp or instagram me at: @dannielle with the hashtag: #styleforahappyhome
*Disclaimer: I was gifted Chalk Paint™ by Annie Sloan to try. For this project I was given 4 sample pots: English Yellow, Pure White, Barcelona Orange and Emperor’s Silk, as well as a pot of the Soft Wax and a brush. I also had two sample pots: Antibes Green and Country Grey and a brush that were in a goodie bag from their event at ProBlogger. I chose to use these colours in this post because I wanted to create something with all the colours that I had. I bought all the other materials myself and was not compensated for this post other than with the product mentioned. I only work with brands that I think are a good fit, and this tutorial was very fun to create. x D
Dannielle, did you just use a stencil brush for the coasters? How did it compare to the Annie Sloan brush? Can you see the brush strokes? Trying to work out of I need to order brushes as well as all the colours on my wish list. Love the idea of mixing colours. I’ll have to add something to my green.
Hi Melissa, I just used a little officeworks brush for the coasters and you can see the brush strokes a little bit. If I was just doing them (and not the bigger tray) I would have used the Annie Sloan brush as I noticed with the test one I did with that brush, you can’t see the strokes. Mixing colours was really easy and I loved the colours that I made.
PS the yellow is somewhere in between a sunshine yellow and a mustard yellow, but could easily be made more of a sunshine yellow with a little pure white added. x