Happy New Year! To kick off 2015, I thought I’d start with a fitting mini makeover that goes with the new year theme: a word of the year frame! If you’re like me and instead of resolutions, you instead set a word of the year, then this frame is something fun you could make to keep your new word at the forefront of your mind as you’re planning for the year to come! The best part about it is that you can also use it as a write erase board and change you word each year!
What you’ll need:
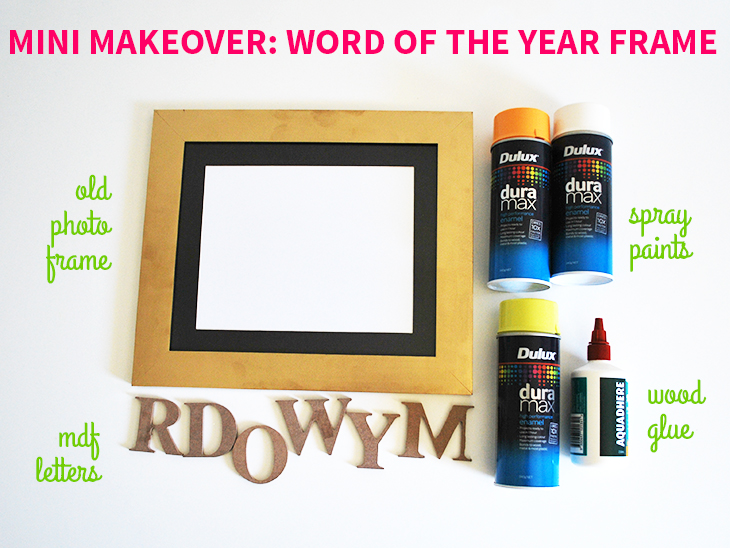
- An Old Frame – I got this one from KMart – it was brown originally
- MDF Letters – I got these at Bunnings. They are the medium size ones I got the letters M Y W O R D for this project
- Spray Paints – I was given these spray paints for a past tutorial but I chose White, Orange and Green for this project – you can use the brand of your choice
- Wood Glue – We always have a bottle or two of PVA glue in our house but you can get some at a hardware store or even the supermarket
- Drop Sheet – I use an old sheet that’s no longer in use
- Optional: Rulers or timber to hold up the letters whilst they are drying
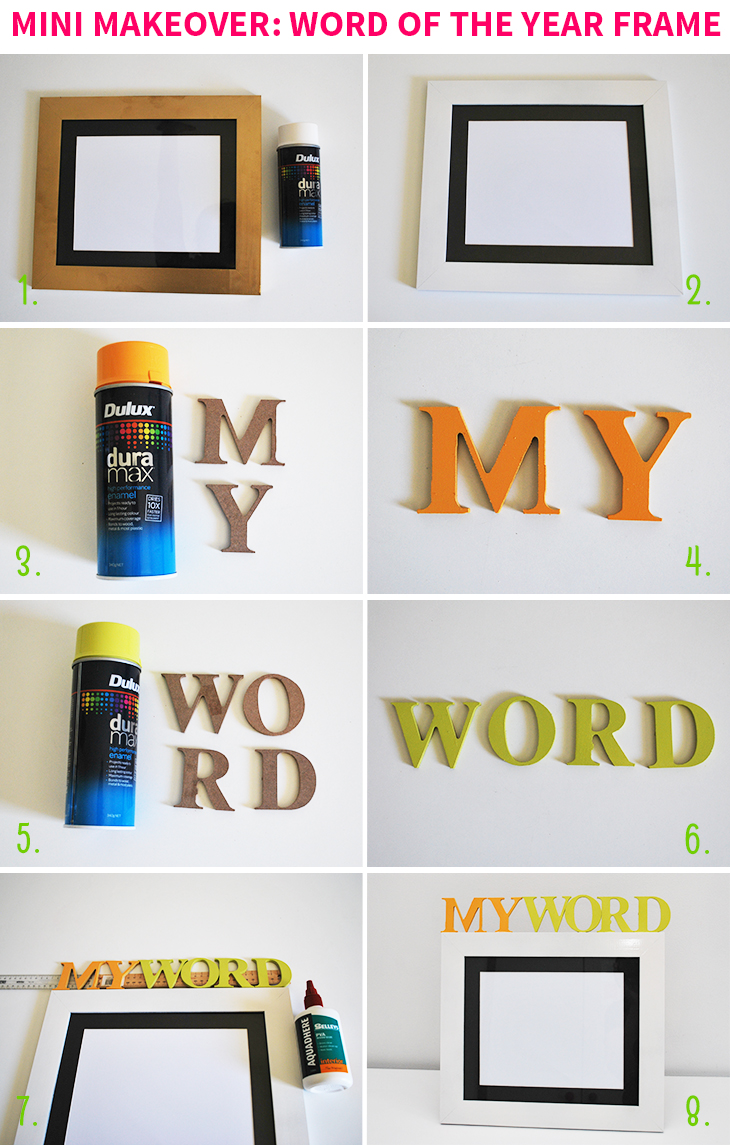
- First, prepare your frame for spraying by removing the backing and the glass and leaving them in a safe place. Next take your frame to your safe spraying area and make sure that you have a dropsheet to protect from over spray. Place your frame top side up.
- Now shake the can as the instructions on the side recommend and get ready to spray. Start spraying a little further out than you think is necessary and move in slowly so you can judge what a slow even spray looks like. Remember to move the can from side to side as you’re spraying and shake as needed. Once you’ve covered all of the top and the sides (don’t forget the inside edges that sit by the glass), leave to dry. Replace glass and backing once all is completely covered and dry.
- Next are the letters M and Y. Take the orange spray paint (or colour of your choice) and get it ready for spraying. (Every can needs to be charged each time you start a new project). Place the M and Y on your dropsheet at least an inch (2cm) apart and spray them in the orange. Don’t forget the sides. Note: I found the colour wasn’t as vibrant as I’d liked, so I ended up adding a layer of white over the first coat and then adding another layer of the colours. Doing white first is a good option.
- Leave to dry and once you’re happy with the coverage, leave to one side.
- Now it’s time to do the letters W, O R and D. Take the green spray paint (or other colour of your choice) and prepare it for spraying as in step 2. Place the letters at least an inch (2cm) apart on the dropsheet and start spraying. (As in step 3, the colour wasn’t as vibrant as I would have liked so I added a layer of white paint in between as the letters are MDF brown) Don’t forget to paint the sides too!
- Leave to dry and touch up where necessary. Once you’re happy with them, collect all the letters (in both colours) and the frame and take them to a flat surface that you will work on.
- Next, prepare your wood glue (by shaking as instructed) and lay your letters out across the top of one long side so you can see how they will fit. Then add some rulers or some timber underneath them so they won’t lean away from the frame as you’re gluing them. Now take one letter at a time and add the glue to the bottom of the letter and place it back on the frame where it will sit and push it firmly onto the frame. Repeat with all the letters. Note: I also added glue where the W and the O meet at the side as the W doesn’t have much holding it at the bottom. Leave to dry. Mine took about an hour before it wasn’t wobbly at all, but it depends on how warm the room is and how quickly the glue dries. The PVA dries clear.
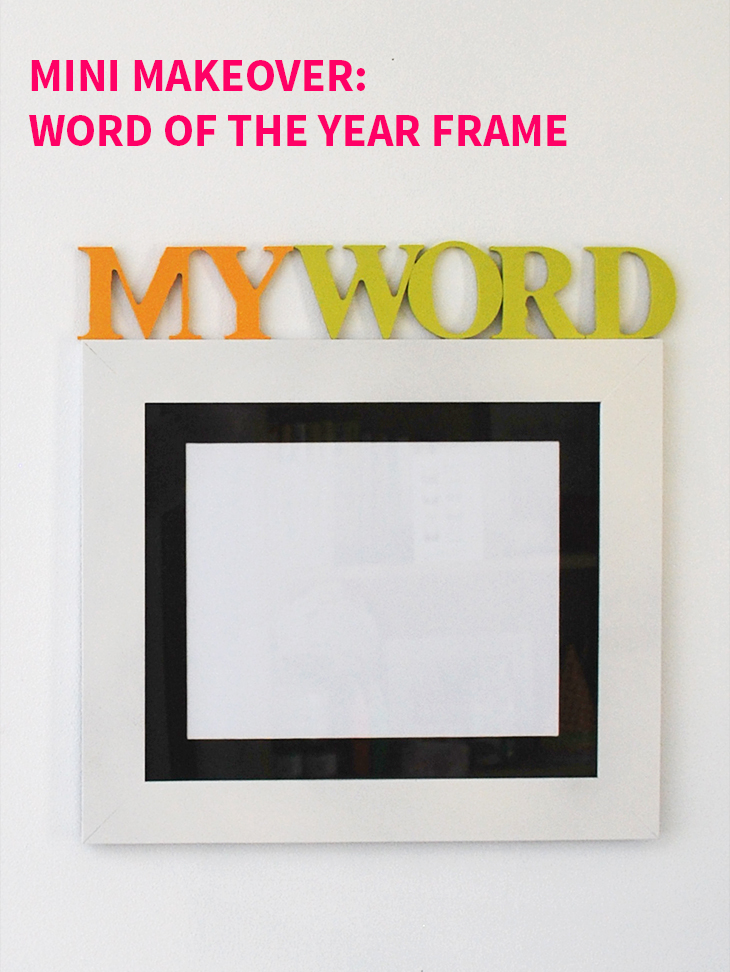
- Now your word of the year frame is ready for you to add you word and hang! Yay!
Thoughts on the project:
This was a fun project to make and I love that I can either add my word inside the frame or use it like a write erase board and write my word on the outside. I decided that I wanted it to be perpetual rather than specifically for 2015, because I do select a new word each year and I love the idea of being able to see it each day as I’m making my decisions!
All the parts were pretty easy to spray and I think they look quite good. I would definitely make the letters white before spraying in colour next time, as the colours are just so much more vibrant on white. The wood glue did take a while to dry, but after the Y feel off when I got impatient and moved it early, I remembered why patience is worth the wait. If I was doing it again, I would consider using an ikea frame that already matches all the other frames on my wall, but I was happy to use what I have around the house.
I’m hoping this will help me keep my word (Geronimo!) where I can remember it, right up until New Year’s Eve 2015!
Do you have a word of the year? How do you like to remember it?
If you do try this, I’d love to see a photo or hear about how it went! Tweet me your pics at: @danniellecresp or instagram me at: @dannielle with the hashtag: #styleforahappyhome
Looks gorgeous! I have never done a word of the year (I think I am too wordy to narrow all my ideas down to one word) but I love the idea. And I love Geronimo!!!!!!!
Thanks, Amanda! Happy new year!
This is a great idea! I’ve been thinking I need to print out my phrase for 2015 and stick it up in my office so I look at it everyday, otherwise it fades from my mind too easily. Love the colours you chose too! Happy 2015 x
Thanks, Emily! I’m happy with how it turned out! Happy new year to you too! x
Looks great Dannielle! I haven’t settled on a word really, but I am planning on kicking my soda habit. Wish me luck :)
Thanks, Sarah! I kicked my soda habit a couple of years back, so it can be done! Good luck! I’m sure you will be off the soda in no time! x
It looks fab, great idea! I’m still thinking about how I’m going to display my word of the year, which is ‘nourish’! All the best for 2015 :)
Thanks, Dani! What a good word! Happy New Year to you!
It looks fab, great idea! I’m still thinking about how I’m going to display my word of the year, which is ‘nourish’! All the best for 2015 :)
Such a clever way to keep on track and I LOVE your 2015 word (although now I can’t get the Sheppard song out of my head… again!). Leap with gusto all year, Danielle! x
Thanks Bron! Sorry for putting that song in your head! I love your word too. x
What a great idea! Love it. Off to share it on Pinterest now :D
Thanks Maureen! x