I’m not really one to follow trends, usually by the time I a) realise that something is a trend and b) decide that I like it, it’s already past and no-one is selling it anymore. haha! But pineapples are something that I have loved since I was a little girl. It started around 1992 when my uncle told someone that he liked them and then it seemed to become a family mission to collect pineapple things for him, all that collecting for someone else, made me notice them. So, today’s mini makeover is all about adding some more pineapple colour to your home in a practical and fun way!
What you’ll need:
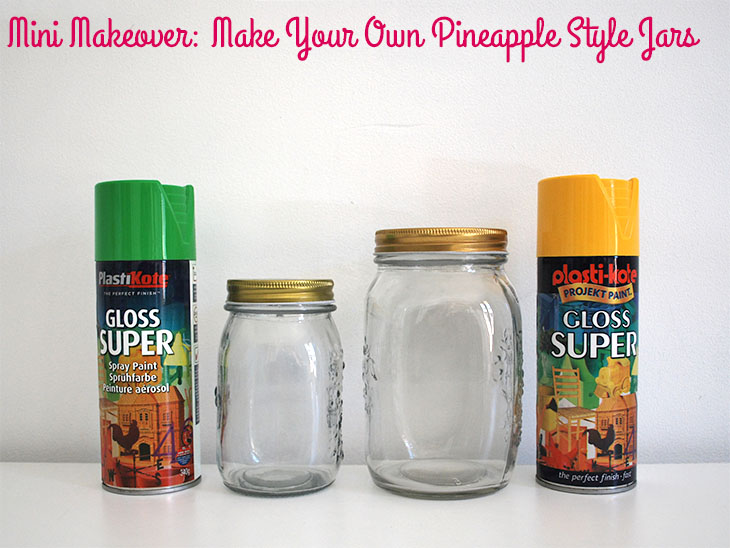
- Glass Jars in different sizes with solid lids – I started with two, but then found a third matching one in the cupboard and couldn’t resist using it too. I got these from a discount variety store. Large $2.50, Medium $2, Small was from my cupboard but I believe they were around $1.50
- Yellow & Green Spray Paint Cans – These were $12.27 each from Masters but any gloss spray paint will do
- Masking Tape – for covering the screw top
- Old Newspaper –for filling the jars with whilst spraying
- Drop Sheet & Somewhere Safe to Spray – I used an old piece of cardboard left over from unpacking our Ikea couches and the back yard
How to:
- Wipe down your jars to make sure they are free of dust and remove the lids
- Take the masking tape and tape around the screw top part of the jar. Be sure to also cover the inside of the glass too so it doesn’t get any excess spray
- Fill the jar to the brim with old newspaper so that no spray can get in
- Prepare your spray cans as directed – most require that you shake them for one minute before any spraying, but check your cans for details
- Take your jars, lids, spray cans and drop sheet to the safe place you will be spraying
- Place the jars base up on the drop sheet and the lids face up far enough away from the jars that they won’t get covered in their over spray – if you need to, leave the lids to one side and spray them after you’re done with the jars
- Take the yellow spray can and carefully start spraying each of the jars. Start a little too far out and slowly move in so that you don’t end up with any runny paint marks – it’s better to do lots of light coating sprays than too much too quickly. Once they are covered in the paint leave them to touch dry (touch dry times will be on the can) before starting their next coat – if your jars are debossed like mine, you’ll need to make sure that the spray covers all the little nooks
- If you’ve got enough room on your dropsheet you can now switch to the Green spray can and start to cover the lids. Again, start a little too far out and move in be sure to not only cover the tops but also cover the sides of the lid too – you don’t want any of the original colour or text shining through. Leave to dry
- Once the jars are touch dry check to see if they need any extra coverage towards the base and spray as necessary. Leave to touch dry again
- When you’re happy with the coverage of the base and that end of the jars, flip them over so they are sitting on their bases, top up. Now you will need to spray around the top where there may be any gaps that were missed before. This happened to me where the top of the jar starts to dip in. Leave to dry completely
- Check the lids are completely covered and respray if necessary. Leave them to dry completely also Your can will have the full drying time on it as well as the touch dry time
- Once they are all dry and you’re happy that they are completely covered, carefully remove the masking tape and remove the newspaper
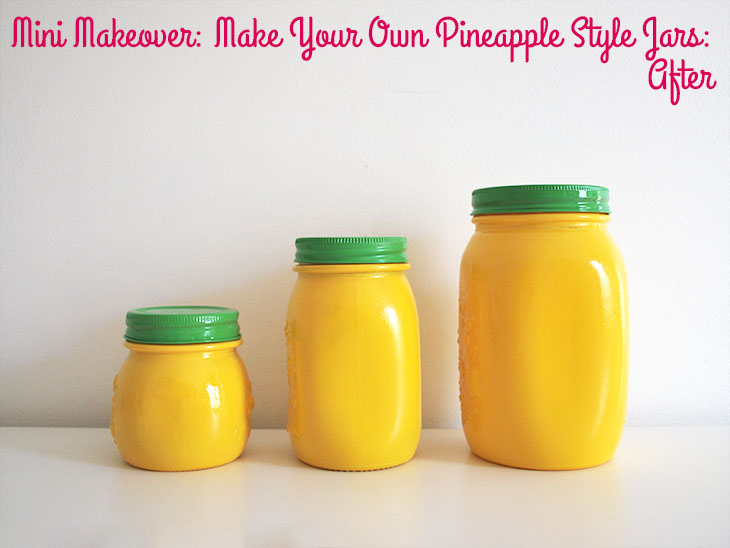
- Fill them with whatever you like and pop the lids on! Your pineapple style jars are ready to go!
Thoughts on the project:
These would be great almost anywhere in the home that needs some colour and would be especially great near a little pineapple collection. They could work well in a Bathroom or the Kitchen for storage or even in an office. You could change up the colours to a different fruit if you prefer. I think the little one would look great in strawberry colours!
What I love about this project is that it’s not too difficult to do, is pretty inexpensive and really adds some quick colour to your home that’s also practical! The jars didn’t cost a lot and the spray cans will cover many projects, not just this one.
Things worth noting: You need to dress in clothes you don’t mind getting paint on or in a painter’s suit of some kind; pay attention to the wind if you’re spraying outside, it can change the direction of your spray and it can also flick up tiny pieces of grass and dust into your wet paint; and look at the touch dry and completely dry times on the spray can when you’re in the store choosing which brand you’ll buy – one hour touch dry really slows a project down compared to 10 minute touch dry.
This project took me most of the afternoon (mainly due to the 1 hour touch dry) to complete, but it really depends on your weather factors and your paint as to the time it will take. When it’s a really warm day with lots of sun it will dry faster than a chilly, overcast day.
I really enjoyed making these and I love the colour they add to my home!
Are you a pineapple lover too? Or do you have a favourite design that you love to have in your home? Tell me in the comments?
If you do try this, I’d love to see a photo or hear about how it went! Tweet me your pics at: @danniellecresp or instagram me at: @dannielle with the hashtag: #styleforahappyhome