I love glitter, but I don’t always love the mess that it makes. Since I found some glitter cardstock a little while back (for this project) I’ve been looking for a way to use it that would be fun but not too messy and I could keep it. So, I decided to make some geometric artwork to add to my office using glitter cardstock. Here’s how you can make one too.

What you’ll need:
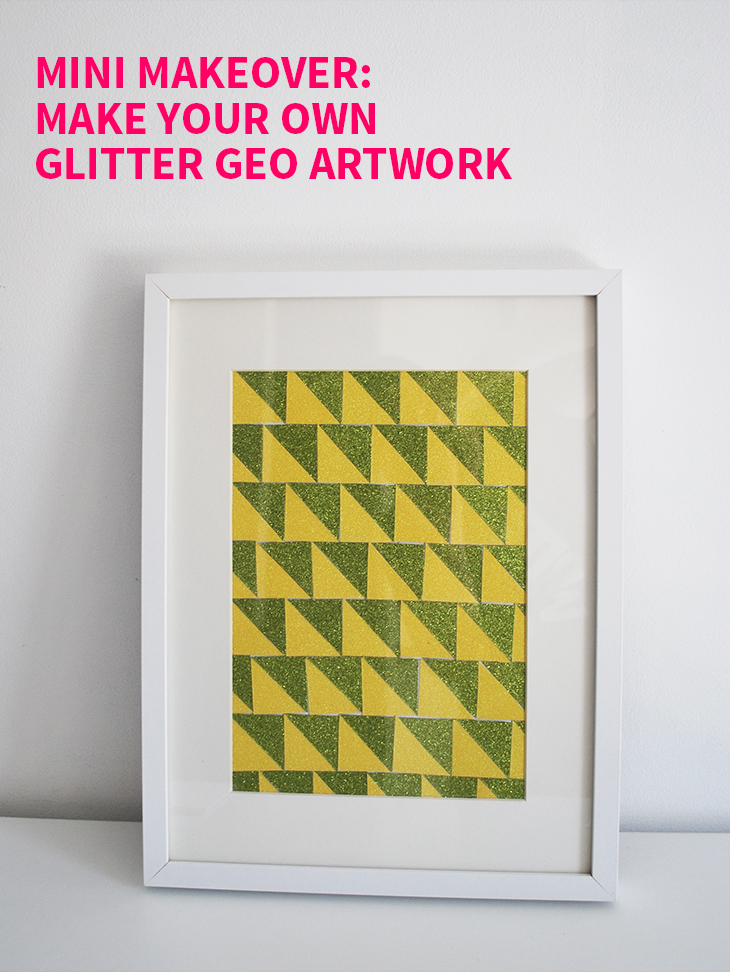
- Glitter Paper x2 this is 12″x12″ cardstock by American Crafts in Yellow and Green
- Backing Paper this is A4 regular printer paper
- Glue I like the blustik but any glue that will hold it’s stick will work
- Pencil a HB or #2 will work well
- Ruler or something with a straight edge
- Scissors I used left handed Fiskars
- Optional: Utility Knife and Cutting Mat if you wanted to use them instead of scissors for cutting

How to:
- Turn your piece of glitter paper glitter side down. Decide on the size of your triangle edges and mark the back of the glitter paper with a pencil using the ruler as a guide. Do one marking for each side. I initially aimed for 37mm on one edge and 35mm on the other, but some cut slightly bigger and some smaller
- Line up the two markings and rule a line between the two
- Now cut where the line is
- You have your first triangle
- Now line that triangle up on the other piece of glitter paper, as shown. Then flip both over and use the first triangle to mark where to cut the other triangle and cut with scissors
- Now you have two peieces that fit together
- Repeat for both colours until you have enough to cover your backing paper. This was 6 x 8 (48) for each colour
- Now it’s time to start gluing them down. Start at the top left of your paper and line up your first two triangles with the top and left edges and glue them down. Repeat from left to right for the top row
- If you have cut your triangles like mine you will have pieces that overhang. Don’t be concerned about them for now. Add any slightly damaged pieces to the edges where they will be cut off if you need to
- For the next line start from right and continue left
- If you have overhanging pieces on this line, they will overhang on the left. Repeat the left to right then right to left rows until you come to the last row
- If you cut your triangles like mine you will have one last gap at the bottom of your artwork. Repeat gluing your pieces down as you have done before making sure that there is plenty of glue covering the top section. Alternatively you could add the glue to the backing sheet and only have glue where they meet
- Once the glue is dry, it will be time to trim the edges to match the backing
- Your geo artwork is ready to be framed!
Thoughts on the project:
I really love seeing this glisten in my office, especially on cloudy days. It wasn’t too difficult to make, though it did take some time to cut out all the triangles. I did initially try to get the triangles to be cut so they fit perfectly on the A4 page, but in the end I’m glad that they turned out a bit bigger than expected and the pattern looks like it’s continuing on past the edges.
It’s one of those ones where the imperfections can be a little frustrating when looking at it close up, but I can’t see them at all now that it’s on the wall. If you don’t love doing all the cutting, I would recommend choosing bigger triangles so you don’t have so many to cut out (or delegate to someone who enjoys cutting out!)
I love the colours that I chose, but I think it would work well with many of the other glitter cardstock options that are available!
Which colours would you choose?
If you do try this, I’d love to see a photo or hear about how it went! Tweet me your pics at: @danniellecresp or instagram me at: @dannielle with the hashtag: #styleforahappyhome