To continue the celebration of this blog turning 2 today(!) I thought I’d share how I made a fun confetti photo booth backdrop using similar colours to my blog’s logo! This would be great for kids or adults parties and is pretty easy to make. Here’s how.
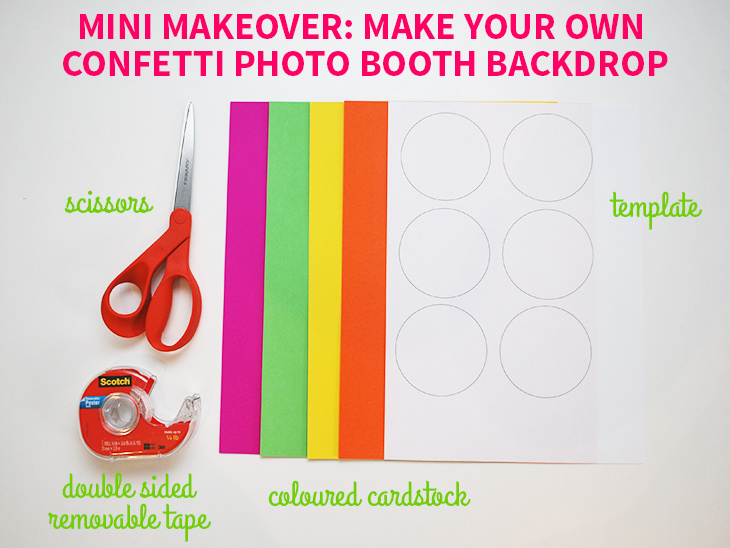
What you’ll need:
- A4 Template for the Confetti you can download this one here
- Coloured Cardstock I recommend 210gsm paper in at least 4 colours, for my photo booth backdrop I used 3 A4 sheets of each colour
- Double Sided Removable Tape so you can stick and remove the confetti without damaging the walls or doors
- Scissors for cutting the confetti
- Optional: 3″ Circle Cutter or Paper Cutting Machine like a ScanNCut
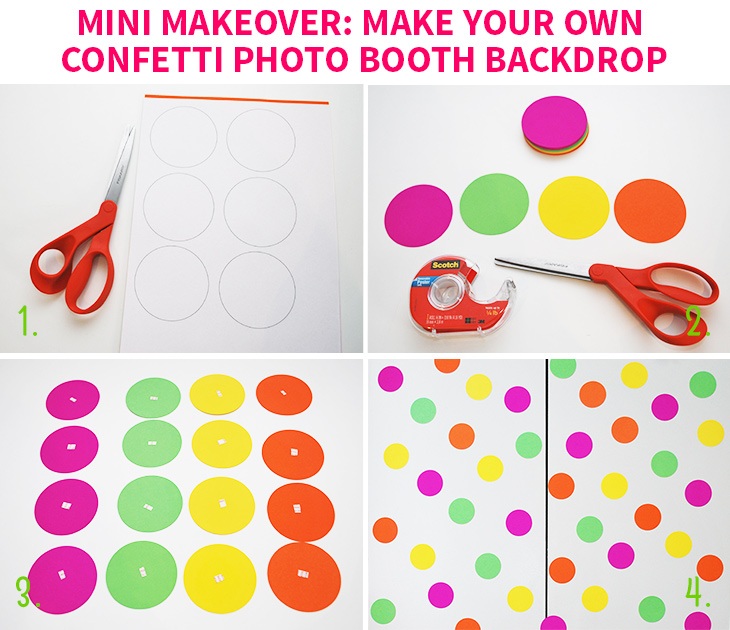
How to:
- Print out a template for each colour. You will be cutting 75mm/3″ circles. Stack the coloured cardstock of one colour together with one template above and cut out the 6 circles on the template. Repeat for all colours. I used 3 sheets of 4 colours (pink, green, yellow, orange), so ended up with 18 of each colour.
- Now using the scissors cut small squares of double sided removable tape for the backs of each of the Confetti circles.
- Stick down the pieces of double sided removable tape and remove any protective backing. I only used a small amount as it’s quite sticky and I don’t need it to last forever. If you want it to last longer, you could use more.
- Prepare your wall or doors for sticking and add them in a haphazard way, leaving some white space between. To get a real confetti effect, have them unevenly spaced. I covered wardrobe doors with mine and left a small gap at the bottom where they would be kicked off the wall and wouldn’t be in the photos anyway.
Now you’re all ready to set up the camera and test out your photo booth backdrop!

Thoughts on the project:
I really enjoyed making this confetti photo booth backdrop. It was easy to do and I love the way that it turned out. I couldn’t find the pink I wanted for the confetti, but I’m still really happy with how it’s turned out. I have mine in my office, so it’s making it feel much happier and more lighthearted.
I think it could also be a fun way to decorate a wall in a teen’s room without too much permanency. It’s probably not great for little ones who can’t resist pulling them off the wall, but could be a wall freeze up high and out of reach. I love how it’s made my dull wardrobe doors look more fun!
Do you do photo booth backdrops for your parties? What’s your favourite?
If you do try this, I’d love to see a photo or hear about how it went! Tweet me your pics at: @danniellecresp or instagram me at: @dannielle with the hashtag: #styleforahappyhome