Paint provided by Dulux Duramax*
My laundry has been a room on my to-do list for a long time. It’s a small space and everything has really just been bundled up on the dryer or on the floor next to it, and it’s never really had much order to it (which drives me nuts!). Recently Dulux contacted me about their new spray paint product Dulux Duramax, and asked if there was any part of my home that could do with some colour. The laundry popped into my head right away, so they kindly sent me some spray paints to try and I decided to make my own colourful laundry storage. Here’s how you can too!

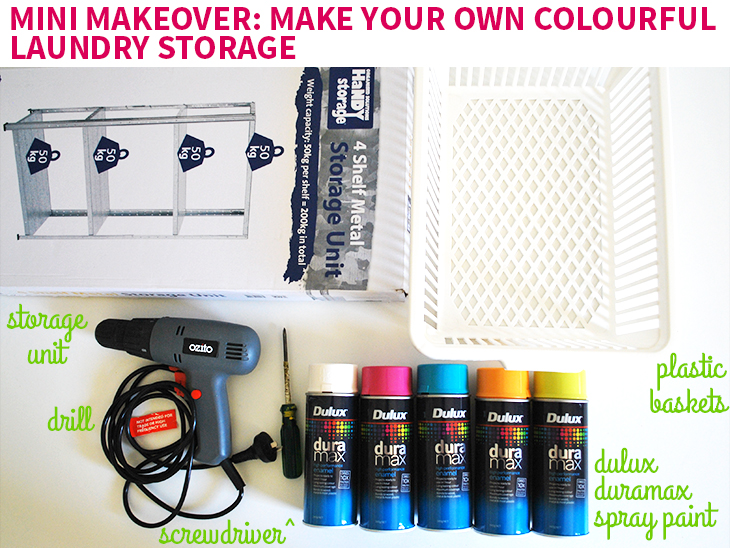
What you’ll need:
- Dulux Duramax Spray Paints I used 2 cans of Antique White, 1 can of Lickedy Lick (Pink), 1 can of Go Go Blue, 1 can Sunshine Surprise (Orange), 1 Can Wiggle (Green) which I was gifted
- Metal Storage Unit I got this at Bunnings
- Plastic Baskets I got these from my local overstock store
- Screwdriver for putting the storage unit together
- Drill for tightening the screws in the storage unit
- Also recommended: Dulux Duramax Metal Primer and Dulux Duramax Plastic Primer I didn’t use these, but they are recommended when working with bare steel and plastics

How to:
Before starting this DIY it’s a good idea to prepare an outdoor area for spray painting and dress in clothing that you don’t mind getting overspray on. I also recommend something to cover your nose and mouth so no overspray gets in your face if the wind picks up suddenly. That’s less fun than it sounds ;)
The cans of Duramax that I used needed to be shaken for 3 minutes before first use, I found that ‘Burn’ by Ellie Goulding and ‘Geronimo’ by Sheppard were great to listen to whilst shaking. Once your cans have been shaken and your spray area has been set up then you’re ready to go!
The Baskets:
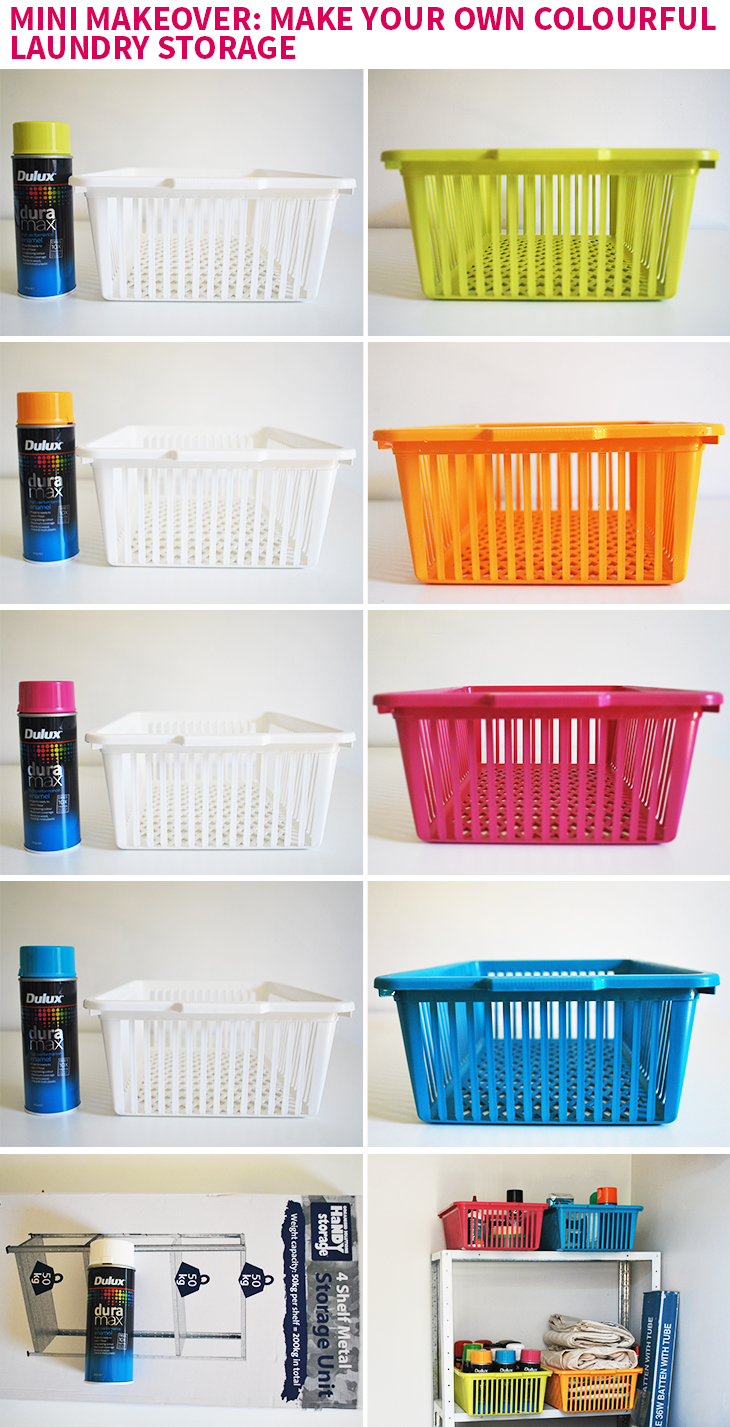
Choose one basket and one colour of the Duramax. Place the basket face up and start spraying around 15cm away from the surface of the basket and move in as needed. I like to spray the outside first from left to write and then spray the inside. Take breaks where you need them and look for white spots where the paint may not have reached. Once they are completely covered, leave to dry. They can be dry in 20 minutes or less, but completely dry in one hour.
Once they are dry on the top you can turn them over and paint the underside. This is less important than the top, but it looks great giving the basket full coverage. Repeat with the other colours and baskets until they are all complete and dry.
I used Wiggle for the first basket, Sunshine Surprise for the second, Lickedy Lick for the third and Go Go Blue for the final basket. I love how vibrant they turned out.
One thing I noticed is that sometimes the paint didn’t want to bond with the plastic and I didn’t realise that I should have added a primer to help them really stick well. I’m happy with how they turned out, but if I was starting again I’d get some plastic primer too! Because these are for the laundry, I’m not fussed, but I’d definitely add the primer in the future.
The Storage Unit:
It took me ages to decide on which colour I wanted for the storage unit. I knew that I wanted colourful baskets, but what would go with all of them?! In the end I picked Antique White and I’m really happy with my choice.
To paint the storage unit I laid out each shelf and each of the pieces of the legs. Starting with one shelf I sprayed the top evenly starting about 15cm out and moving in as required. Then I moved on to each of the other shelve tops and painted them and left them all to touch dry.
Then I took the leg pieces and sprayed each one on their two outer sides, trying to get a nice even coverage, and then left them all to dry.
Returning to the shelf tops, I then sprayed the outer edges of all four shelf tops. This can be a little tricky if they sink into your drop sheet at all so you might want to prop them up so they are easier to spray.
Leave them to completely dry before bringing all the pieces inside and assembling them as per the instructions in the box using the drill and the screwdriver.
I decided to only spray the outside of the storage unit and leave it with a metal look on the inside. I think it works well for the space. I used 1 full can of Antique White and about half of a second can for this. This was pretty easy to spray but do watch out for how much the metal can heat up in the sunshine if you’re outside. Mine did get quite warm. The metal primer is recommended, though I didn’t use it and the paint seemed to bond well. I can see in time it will wear due to high use, but as it’s in a more ‘industrial’ area of the home I’m happy with that.

Before and After:
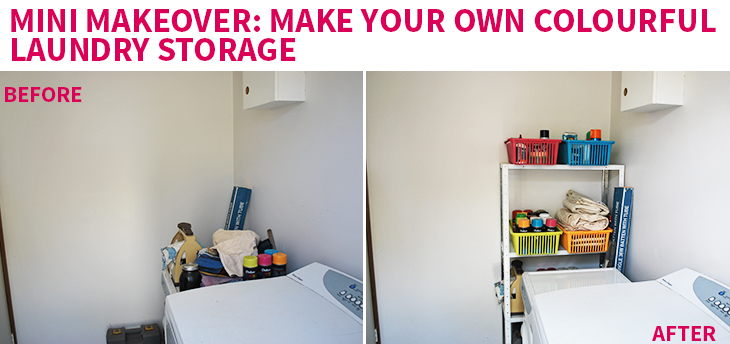
My laundry really needed some work and I’m so surprised at the difference that this DIY has made to the space. Things are all in colour coded baskets now so they are easy to find and things aren’t spread around the house that really belong in the laundry. It’s a tiny space without much natural light (I opened the flyscreen and took these shots from outside to try to get some light). Having the dryer top empty is just wonderful and I hope that we can keep it that way.
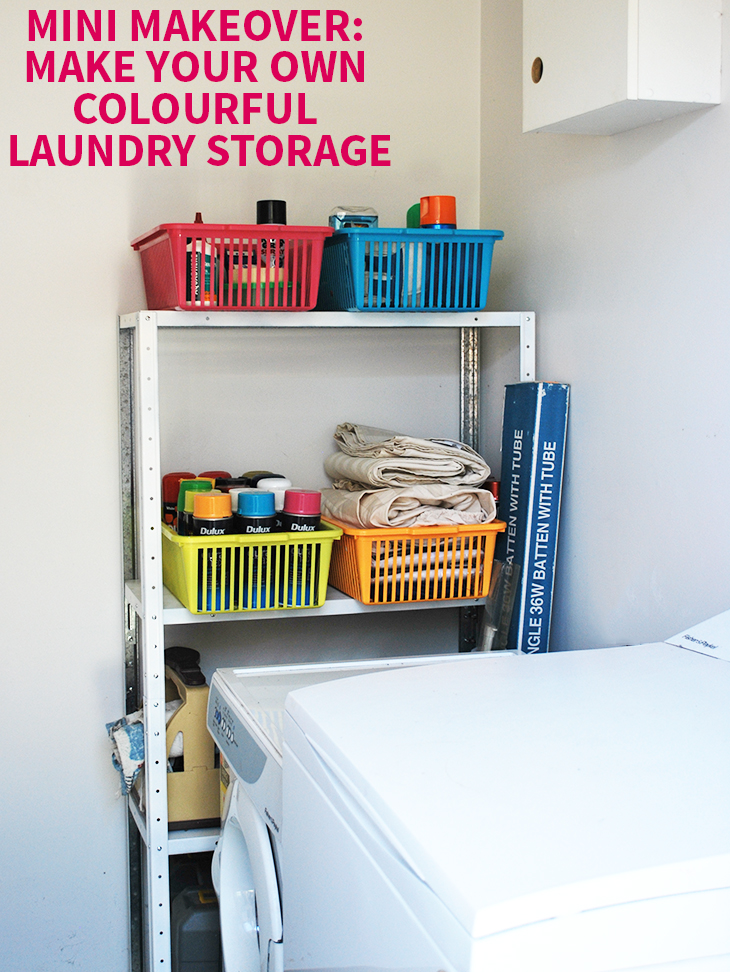
My colour coded system is: Lickedy Lick Pink for Adhesives (glues; packing tape, duck tape, frogtape, etc; and spray adhesive), Go Go Blue for Home Care (poisons; gardening gloves; car cleaning; etc), Wiggle Green for my Spray Paints, and Sunshine Surprise Orange for Painting Accessories (Drop Sheets (I use old bed sheets for drop sheets when they’re no good as sheets anymore); Boiler Suits; etc).
The lower two shelves allow me to put things away that didn’t previously have a home or that lived on the floor in that corner, which is fantastic! The whole feel of the space is different now. It’s much neater now and makes it a much happier space to be in.

Thoughts on the project:
I really enjoyed choosing the colours and spray painting all of the baskets and the storage unit. The Dulux Duramax is a great paint to work with and whilst I learnt that primer is a good thing, I’m still super happy with how the laundry turned out and this is a paint that I would buy myself in the future. The grip on the top is a good size and made my finger less sore than some of those really thin ones that are on the market.
The only thing that I noticed was different to the other brands I’ve tried in the past is the preparation time for shaking the can, but I did also notice that the paint covered more than other cans, so the preparation time seems to be worth it to me. It’s also a great excuse for a dance break and I’m always pro dance break!
I am loving my new laundry and I’m glad I can finally tick it off the list. I have paint left over so I might have to see which other rooms need some great colour next!
If you’re looking to get your hands on some check out the giveaway below or the paint is available at all major paint retailers. Stockist details are at www.dulux.com.au or 13 25 25.
Giveaway:
The lovely people at Dulux have kindly offered 5 cans of Dulux Duramax for one lucky winner in Australia to the value of $64.75.
To enter, all you have to do is answer this question in the comments: What would you makeover in your home with Dulux Duramax?
- Open from 13 November 2014 to 20 November 2014 at 8pm ADST for Australian Residents only
- Prize is 5 cans of Dulux Duramax to the total value of $64.75 (Dulux Duramax retails for $12.95 per can)
- Prize will be drawn at 8:05pm ADST 20 November 2014 winner will be emailed – your email address and name will be forwarded to Dulux (so they can post your prize) if you win
- You must enter a valid email address in the email section below and be contactable if you win
- One entry per person
- If the winner doesn’t reply by 27 November 2014 the prize will be redrawn
- Winner will be drawn using random number generator – this is a game of chance
GIVEAWAY CLOSED – WINNER HAS BEEN NOTIFIED – THANKS FOR ENTERING!
Disclaimer: I received this paint from Dulux Duramax for the purposes of review. I was not paid for this post other than the paint I received. All opinions are my own and I paid for the products that were painted with my own funds. Working with the right brands helps to keep this blog running and as always, I only share what I think will also be great for you. D x
Wow!!! That looks so fantastic and I love the colours!
I think I would do my laundry too. It is ouside and it is drab and tired looking. The shelving could most definitely do with a makeover!!
Love the baskets. I have some storage in my linen closet that I would love to make over. It’s tired and doesn’t work. Plus it does not look as much fun as your baskets.
I love these colours, I would use them to paint baskets for my son’s toy room. I am in desperate need of storage in there and I think these painted baskets would look great.
Oooooh, what I WOULDN’T do with those?! Haha spray paint is my favourite thing of all time.
I think something for the new nursery, probably x
Great work!
I would make-over my pot plants and make them colourful to match the decor of my small balcony :)
Thank you :)
I have this really great chair that is an old tractor seat welded to a roughly made metal tripod. I painted it yellow, but I did a really bad job and left it outside for too long and now it needs to be re-done…and done properly, then I can have it as a great feature piece in my slowly coming together lounge room.
Oooh, my kids would go CRAZY for those colours! I’ve been wanting to repaint the doors in my house, especially my kids’ bedroom and BIR doors.
I think rainbow doors would be a nice splash of colour in my rather neutral home. :)