This post is a product review for moo.com*
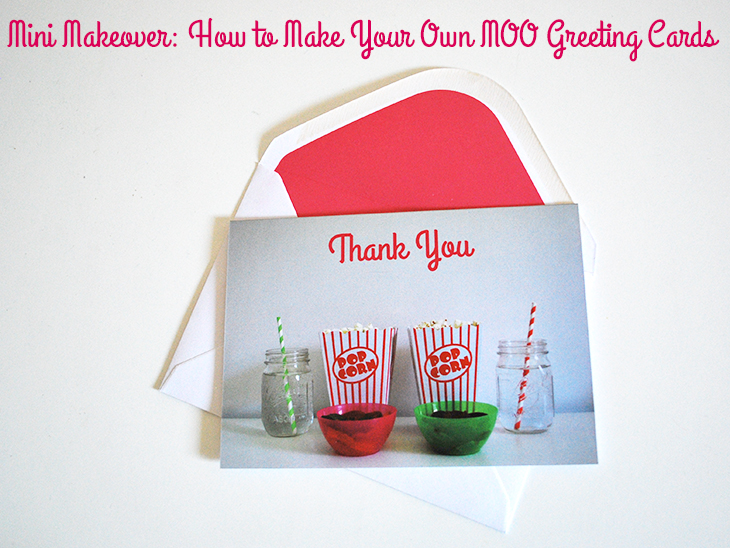
Making your own greeting cards that look professional and fun can make sending snail mail just that little bit more fun. Whenever I want to make anything like this my first stop on the internet is always moo.com. I have been using MOO for my business for nearly 5 years and I love their quality, so when the opportunity came up to review them and share that with you, I jumped at the chance. Today I wanted to share how you can make your own greeting cards and have them printed by MOO. There’s a giveaway for 3 lucky Australian Style for a Happy Home readers at the end, so be sure to read on!

What you’ll need:
- A Computer with Internet Access
- A Digital Photo (or digital photos) that you want to make a greeting card(s) of
- Photoshop, Photoshop Elements or a Canva Account for designing your cards
- Time to make your awesome greeting cards

Steps not shown are on the MOO website which is very user friendly.
How to (Photoshop and Photoshop Elements):
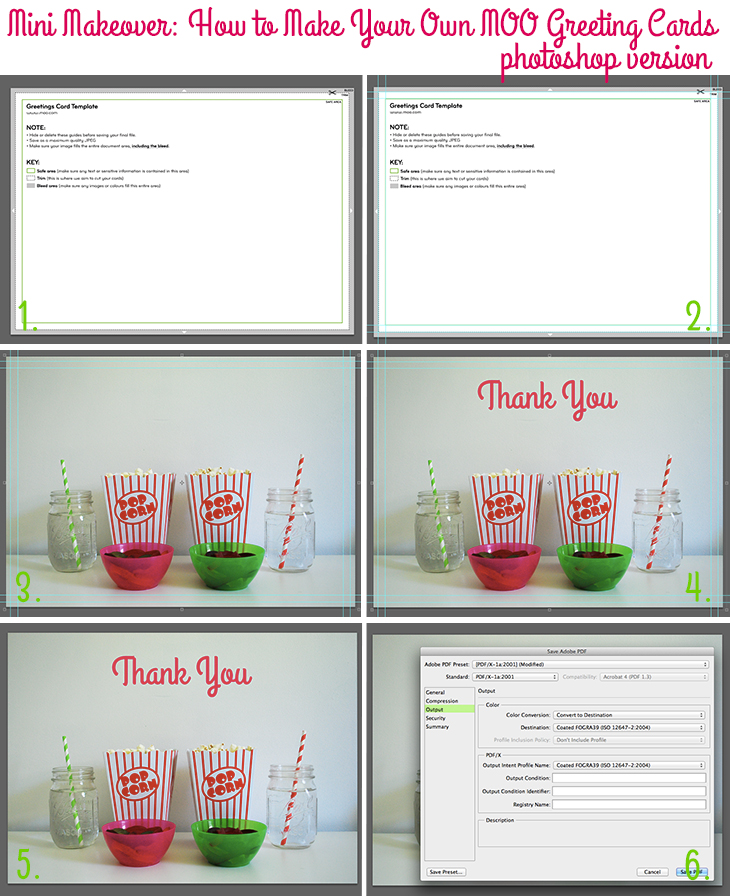
- Start by heading to moo.com and navigating to the Artwork Guidelines page. Scroll down to the Christmas & Greeting Cards templates and download the Adobe Photoshop Template (psd). Once downloaded open the template in Photoshop or Photoshop Elements. These screenshots are from Photoshop CS6, but I’ve also used Photoshop Elements 9 & 10 and it works very similar (though the menus are slightly different)
- Now it’s time to show the blue guides. If the guides aren’t showing choose View > Show > Guides… MOO has already set them for the trim lines (where your design will be trimmed by the printer) and the safe area (where the important parts of your design need to be)
- Open your digital photograph or image that you’ve chosen and add it in on top of the MOO template. (I do this in Photoshop by opening the image, selecting Layer > Duplicate Layers and choosing the template from the dropdown menu and clicking OK) Resize it to fit where needed. Remember that anything that must be in the final card should be within the safe area (which are the inside blue guides)
- Optional Step: Choose a font you love and add some text. Shift it around the image to a spot that looks best. I chose to centre mine towards the top in the font and colour I use for my blog’s post titles. Have a play around with it until you’re happy with the look.
- Once you’re happy with the final look delete or switch off the template layer from MOO so that there’s no chance it might accidentally get printed and hide the blue guides so you can see the final image (View > Show > Guides… will also hide them)
- Now it’s time to save the image. There are two options .jpg and .pdf. Sometimes .jpg will leave any text a little bit fuzzy when printing, so if you have the option for a vector pdf, that is a good choice. For exactly how to do the vector pdf follow the MOO instructions here (step 4) and convert any text to shapes (pdf only). I’ve used and been happy with both jpg and pdf, but I have noticed the text is crisper with the pdf
- Optional step: MOO allows you to upload 25 different greeting card designs per pack, so repeat the steps above if you want more than one card design in your set
- Now head to the moo.com site and navigate to the greeting cards page and click create greeting cards. Choose the option to upload your own. Have a read of their instructions and start uploading your images by clicking the green button in the middle. Wait for them to upload
- Once they are uploaded you will get a green tick next to them (or more instructions if there has been an error). Click Next Step to move on
- Here you will get a preview of your cards, check for any fuzziness and decide if you want to keep them all (there’s a handy tick box under each if you decide you don’t want them any more)
- Next you can add a message to the inside of your cards and change the colour and the font. You can also leave it blank if you don’t want anything on the inside Click next step when you’re ready
- This step allows you to personalise the back. You can upload an image, or there is space for you to add your message. You can also choose to keep or remove the moo.com logo
- Then it will ask you how many you want to purchase with an easy set of tick box options! Click Add to Cart to continue (don’t worry, they let you preview again during the checkout)
- Your final step before the checkout is to choose your envelopes. I love that they have coloured options beyond just the white. The colour options cost a bit extra, but I chose the white with magenta liners as they match my branding perfectly! White envelopes come as standard
- All that’s left is to checkout and pay, and wait for your awesome greeting cards to arrive!
- Then share them with all your friends!
Don’t have Photoshop or Photoshop Elements? Here’s how you could do it with Canva: (please note: I’ve not printed with moo after using canva, but I did upload to test that it works)

How to (Canva):
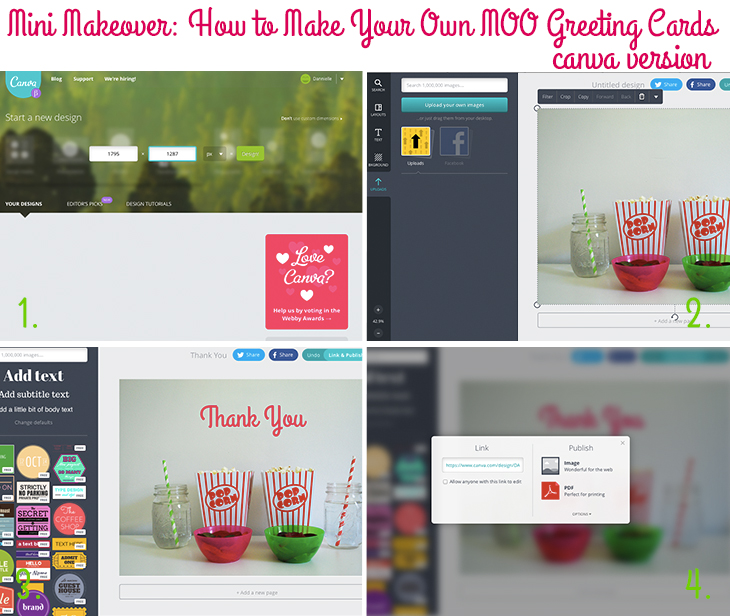
- Start by heading to moo.com and navigating to the Artwork Guidelines page. Scroll down to the Size/Resolution look for the recommended dimensions for Postcards and Greeting Cards note down 1795 x 1287 pixels.
Now go to Canva and once logged in select use custom dimensions type 1795 in the first box and 1287 in the second for a landscape card (switch them for a portrait image) and click Design! - Click Uploads on the left and Upload your image and drag and drop it into the template on the right hand side. Adjust it where necessary. Canva doesn’t have the guides to tell you where the trim lines and the safe area are, so you need to keep that in mind. This means that you should keep the most important areas towards the centre, to ensure they are within the safe area. See photoshop tutorial images for an example of the guides
- Optional Step: Choose a font you love and add some text. Shift it around the image to a spot that looks best. I chose to centre mine towards the top in the font and colour I use for my blog’s post titles. Have a play around with it until you’re happy with the look. You could also add in one of Canva’s great overlays like a circle with text – just remember the safe area
- Once you’re happy with the final look click Link & Publish (top right) and choose the PDF option. Wait for it to download to your computer and note where you saved it and the file name
- Optional step: MOO allows you to upload 25 different greeting card designs per pack, so repeat the steps above if you want more than one card design in your set
- Now head to the moo.com site and navigate to the greeting cards page and click create greeting cards. Choose the option to upload your own. Have a read of their instructions and start uploading your images by clicking the green button in the middle. Wait for them to upload
- Once they are uploaded you will get a green tick next to them (or more instructions if there has been an error). Click Next Step to move on
- Here you will get a preview of your cards, check for any fuzziness and decide if you want to keep them all (there’s a handy tick box under each if you decide you don’t want them any more)
- Next you can add a message to the inside of your cards and change the colour and the font. You can also leave it blank if you don’t want anything on the inside Click next step when you’re ready
- This step allows you to personalise the back. You can upload an image like I did, or there is space for you to add your message. You can also choose to keep or remove the moo.com logo
- Then it will ask you how many you want to purchase with an easy set of tick box options! Click Add to Cart to continue (don’t worry, they let you preview again during the checkout)
- Your final step before the checkout is to choose your envelopes. I love that they have coloured options beyond just the white. The colour options cost a bit extra, but I chose the white with magenta liners as they match my branding perfectly! White envelopes come as standard
- All that’s left is to checkout and pay, and wait for your awesome greeting cards to arrive!
- Then share them with all your friends!
Steps not shown are on the MOO website which is very user friendly. I’ve not personally used Canva for designing before printing with MOO, but I did test their upload process and there was no fuzziness that I could see on my screen. I wanted to offer a free alternative for those who do not have Photoshop or Photoshop Elements, but please use at your own discretion. – D

Thoughts on the project:
I love personalised greeting cards and I really love the fact that MOO allows you to buy in small batches and with lots of different designs, so when you’re as indecisive as me, you’re not stuck with hundreds of cards when you really only wanted to try a few in each design. The quality is great and I’m happy to use their services over and over again. I think these could be great for birthday cards, christmas cards, invitations and even “welcome to the world” cards. They also offer postcards and a whole range of other products that all have templates that you can start with.
From a micro business perspective, I love the small batches and the quality finish that looks professional and means that I don’t have to look like I have a limited budget when I’m handing out marketing materials. I’m also thinking of ways I can personalise my christmas cards for family and friends, something that goes that extra mile to make them feel special. Sometimes designing them can get a little overwhelming, but I like to remember to keep it simple, and then my designs usually turn out great! I think that’s a good rule of thumb for everyone.
Giveaway:
The lovely folks at MOO are offering 3 vouchers worth £50 (AU$ 90) each for moo.com. The voucher can be used to purchase anything on the website, including delivery! (For 3 separate winners, open within Australia only)
Enter by leaving a comment on this blog answering the question: What would you love to design & have printed by moo.com?
Terms and Conditions:
The name of the promotion is: MOO Print competition
The promoter is Style for a Happy Home in conjunction with MOO
The conditions of entry are: that you are within Australia, that you answer the question, one entry per person
Employees, immediate family members, retailers, suppliers, associated companies and agencies are not eligible to enter.
The giveaway will close on 8th May 2014 at 5pm AEST. Comments submitted after this time will not be considered for the giveaway.
This is a game of skill. The winner will be awarded based on the strength of their answer to the question What would you love to design & have printed by moo.com?
The prize will be in the form of product which will be sent to the winner once address details have been provided after the competition has closed.
The results of the giveaway will be published on this site on 10th May 2014.
Prizes are not redeemable for cash and are non-transferable
.
The total prize value £150 (AU$ 270). 3x £50 (AU$ 90) vouchers.
The competition is open to Australian residents only.
If for any reason beyond the Promoter’s control the agreed prize is not available a product of equal or greater value will be provided.
The Promoter is not responsible for prizes once they have been dispatched to the winner.
GIVEAWAY CLOSED – WINNERS HAVE BEEN DRAWN – THANKS FOR ENTERING!
Winners are: Deb – Two Cheeky Monkeys, louise and Amanda – emails have been sent
Disclaimer: I received product from MOO to review for this post. The words and opinions are my own. MOO and/or Style for a a Happy Home are not associated with Photoshop or Canva, they are just used as examples of ways to create before using moo.com. Working with great brands, like MOO, helps me to keep this blog running and sharing great content with you. As always, I only share things I think you’ll love or find helpful. Enjoy and good luck! x
I’ve had this idea to start a local craft social group – I think the Moo postcards would be great to promote it. I
I have always wanted some of the gorgeous MOO mini business cards! I looooooove that you can use so many photos on them, and they don’t all have to be the same! The only reason I’ve never ordered any is because I could never decide which photos to use LOL
I’m not very good at editing photos for Moo – so thanks Dannielle!
I love writing thank you notes to my customers, so I think I would be aiming for some Moo letterheads and mailing labels next!
I’d love to design a range of postcards using my own illustrations and have them printed up using moo
I absolutely need some new postcards. Because snail mail is the best! I love receiving them, I love sending them. I love sticking them up on my walls where I can see them, and remembering beautiful friends who sent them to me.
And of course, the Moo quality is outstanding. They even feel nice!
Thank you, moo is awesome. I have a “thing” for birthday/greeting cards, I love buying them and I love giving them too. I’m pretty sure I’ll love creating them just as much! What an awesome find! I also love the stickers, my daughter’s name is not on any of the “named” things that they aell in the shops, how cool to crank out a heaps of really cool stickers, all different and add them to birthday presents etc…
It’d be awesome to make some personalised birthday cards for my friends and family, with in jokes and their favourite things on them :)
Love your design with the popcorn, so cute!!
I would love to get my son (aged 4) help to pick his favourite photos from his recent birthday party to send some surprise cards over to his grandparents, aunts/uncles and cousins in Europe – they never get to come to his birthday parties so they would definitely love to get some groovy cards about them.