One of the things I like so much about adventures, both close to home and far away, are the little things we collect along the way. They may not be fancy or expensive. But they do hold a little place in our hearts that remind us of a day or an adventure and allow all the great memories to come flooding back, right when we need them to. I thought it would be fun have somewhere to keep those little things we collect on our travels. Today’s mini makeover is a repurposed tin that would be perfect for that!

What you’ll need:
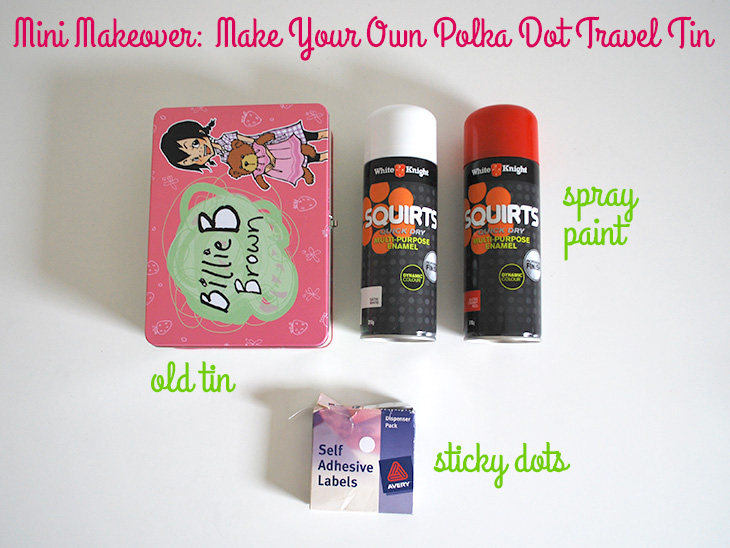
- Old Tin This was given to me from a cousin who no longer wanted it. It’s a great size for a travel tin!
- Spray Paint in two colours I chose Satin White and Gloss Cherry Red from Bunnings ($7.95 each) for this project
- (Removable) Sticky Dots We’ve had these forever so I’m not sure their price, but they are 14mm removable labels
- Drop Sheet for over spray
How To:
- Wipe down the metal tin and make sure it’s free of dust or oils
- Prepare your spray paint by following the instructions on the can – for these it’s shake the can for 1 minute to charge it up
- Prepare your spraying area by putting down a drop sheet and make sure you’re wearing clothing that you don’t mind getting covered in paint or wear a painter’s suit. Also consider gloves for this as I have bright red paint stains on my hands (classy ;)) For this I added a large piece of cardboard over a wheelie bin so that the tin was at arm level and I didn’t have to hurt my back spraying the sides
- Take the tin and place it on your drop sheet. Get the White (the colour that will become the polka dots) and start spraying from what feels like a little too far away and move in until you get a reasonable spray. Try not to go in too close as you will get pressure spray marks. Lots of sweeping short sprays are better than one big one
- Go around all 4 sides until the tin underneath is no longer visible, and then cover the top.
- Leave to dry. For this one you will need to leave it to dry completely, not just to the touch dry stage (Check the times for both of these before buying the can if you can). This was a 1 hour complete dry, though as the weather was a little chilly, it took about 15 minutes longer.
- If there are any major bits of the tin underneath showing you will need to spray again and leave for the complete dry time again. Try not to get impatient with this process. I did and ended up making twice as much work for myself when I got finger prints in the paint.
- Optional step: If it’s for a gift or you just like it to be completely covered, you can also spray the tin underneath. (If you do, make sure that the top is completely dry first or you will need to repaint it where it stuck to the drop sheet whilst you were spraying the base.) This will need to be completely dry before you turn it back up the correct way.
- Once it’s completely dry and you’re happy with it, now take the sticky dots and add them in a pattern (I chose a haphazard ‘pattern’) over the top and across the sides of the tin where your white paint will show through. If you have any imperfections in the white paint layer put your polka dots around them so the red layer will cover them
- Press down the dots once more to make sure they’re secure, and now start spraying with the Red (outer layer) spray paint. As in step 4, start a little too far out and move in until you get an even spray. Don’t go too close or the spray will run and it will make you sad and annoyed (yep, I got impatient and went in too close, even I need reminding sometimes). Spray the sides and the top until completely covered. Once you’re happy with the coverage, leave to dry completely.
- Check it over. If it doesn’t need any touch ups and is completely dry, you can start to carefully peel off the sticky dots. There may be a little bit of paint chipping if it’s not completely dry, so I recommend going slowly. If you need to you could use some needle-nose tweezers, but be careful not to scratch the paint surface with them.
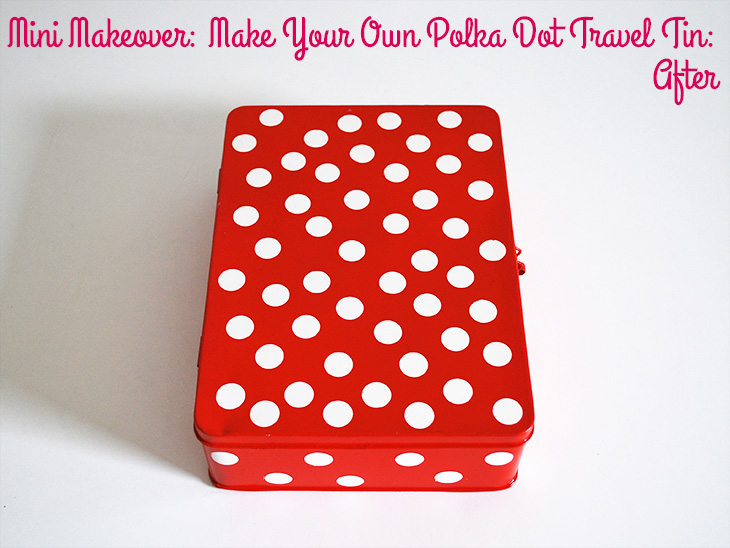
- Once they are all peeled off you should have your finished polka dot travel tin! Now you can add some travel trinkets to it or gift it as a gift!

Thoughts on the project:
This was a little trickier than any spray paint project that I’ve undertaken before (my first with two colours). It takes more time and more patience than the others, so it’s not one to try whilst in a rush. You could do this as an activity with school aged children, though I would use brushes and tin paint rather than spray paint. The tin will need an enamel paint, so a CFC free non-chroming enamel would be better. Enamel is a bit stinky too, so it would be better in a well ventilated room or outdoors.
I enjoyed making this and I loved how it turned out. I do need to remind myself not to get impatient and spray too close to the tin, but sometimes it still gets me and I make the mistake. I love having the little imperfections that remind me that it’s been lovingly made, but it would be nice to not leave fingerprints in the paint because I momentarily forgot it was wet!! haha
The tin could be used for anything, but I do love having a special place to keep trinkets and other things that are travel related and this would look great on a shelf as a memory box too. Next week I’ll show you another cool way to use a tin like this.
Do you have travel tins? Would you like to try your hand at this one?
If you do try this, I’d love to see a photo or hear about how it went! Tweet me your pics at: @danniellecresp or instagram me at: @dannielle with the hashtag: #styleforahappyhome
P.S. This weekend I’m having an adventure of a different kind – I’m running my first race of the year the 15km run 4 the kids! That runs right through the heart of Melbourne and across the Bolte Bridge!! Eep! Wish me luck, I think I’m going to need it! x
Ooh that is super-clever!! My Mr4 would love a tin like this. Might have to add it to the school holiday to do list. (Although we may never get through Mr4’s first item – he announced very excitedly that what we should do in the school hols is “clean the whole house! Inside and outside!” – am starting to think he is not my son).
Hehe! It must be fun to have a little cleaner sometimes. (except if they’re a bit more of the managerial type, delegating all the tasks to you ;)) I hope you had a great school holidays. x
This is so darn cute!
Thank you, Sarah. x