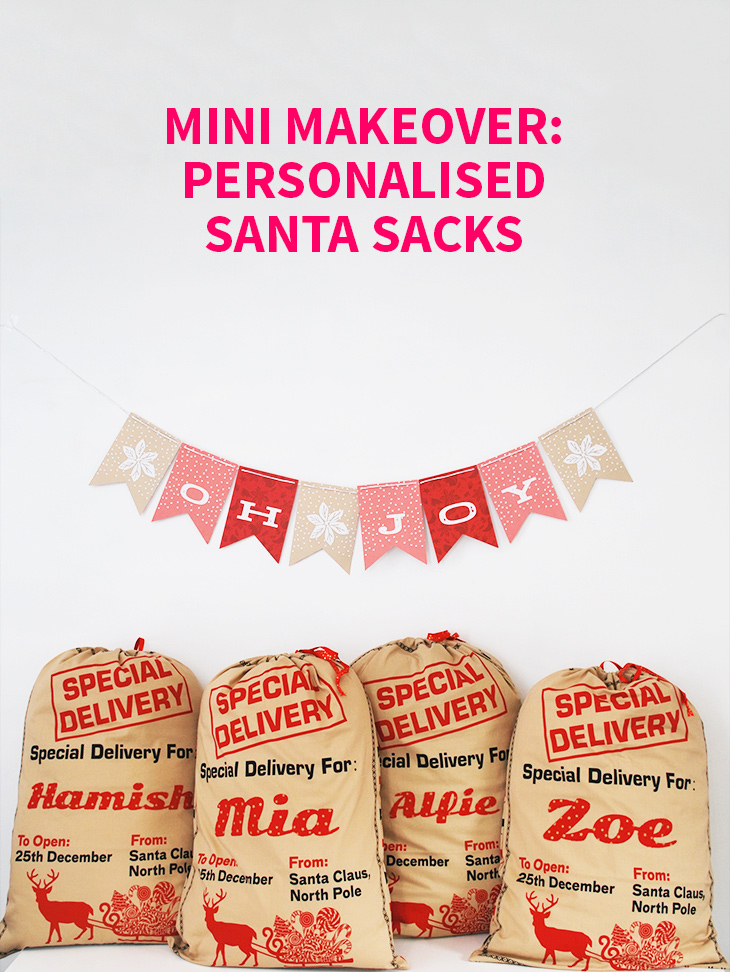
I was looking through the Spotlight* catalogue recently and I saw this fabulous set of fabric panels for Santa Sacks and I had a lightbulb idea on how to make them extra special. But I don’t have any wee ones of my own so I asked a couple of friends (who both have 2 wee ones) if they were looking for Santa Sacks this Christmas and if I could use their Kiddos’ names for this project. The answer was yes! and it was time for me to grab some fabric and start making for Zoe, Mia, Alfie and Hamish. Here’s how I made them!

What you’ll need:
- Santa Sack Fabric Panel – This is the Deer Sack Panel from their “Hessian Christmas” range (fabric is cotton), comes with two front sides
- Reindeer Pattern Fabric – Also from the “Hessian Christmas” range I purchased 1 metre per panel, but had left over fabric
- Red with Gold Stars Fabric – Also Cotton. I purchased 1 metre, but had lots left over. Length depends on the size of the names
- Erasable Fabric Pen – Can use pencil if you don’t have one
- Safety Pin – For threading the ribbon
- 10mm Ribbon – In red with gold stars to match. Also from Spotlight
- Sewing Pins – For holding Fabric Together
- Scissors – For cutting the panels
- Red & White Thread – For sewing the seams and names
- Snips – For tidying the excess threads
- Ruler – for measuring the folds
- Sewing Machine – For stitching the Sacks
- Scan N Cut – For cutting out the names. If you don’t have this available you can hand cut the names using a printed template
- Iron-On Transfer Sheets – For attaching the names to the panel
- Iron – For pressing the fabrics
- Optional: Baking Paper – for ironing on
How to:
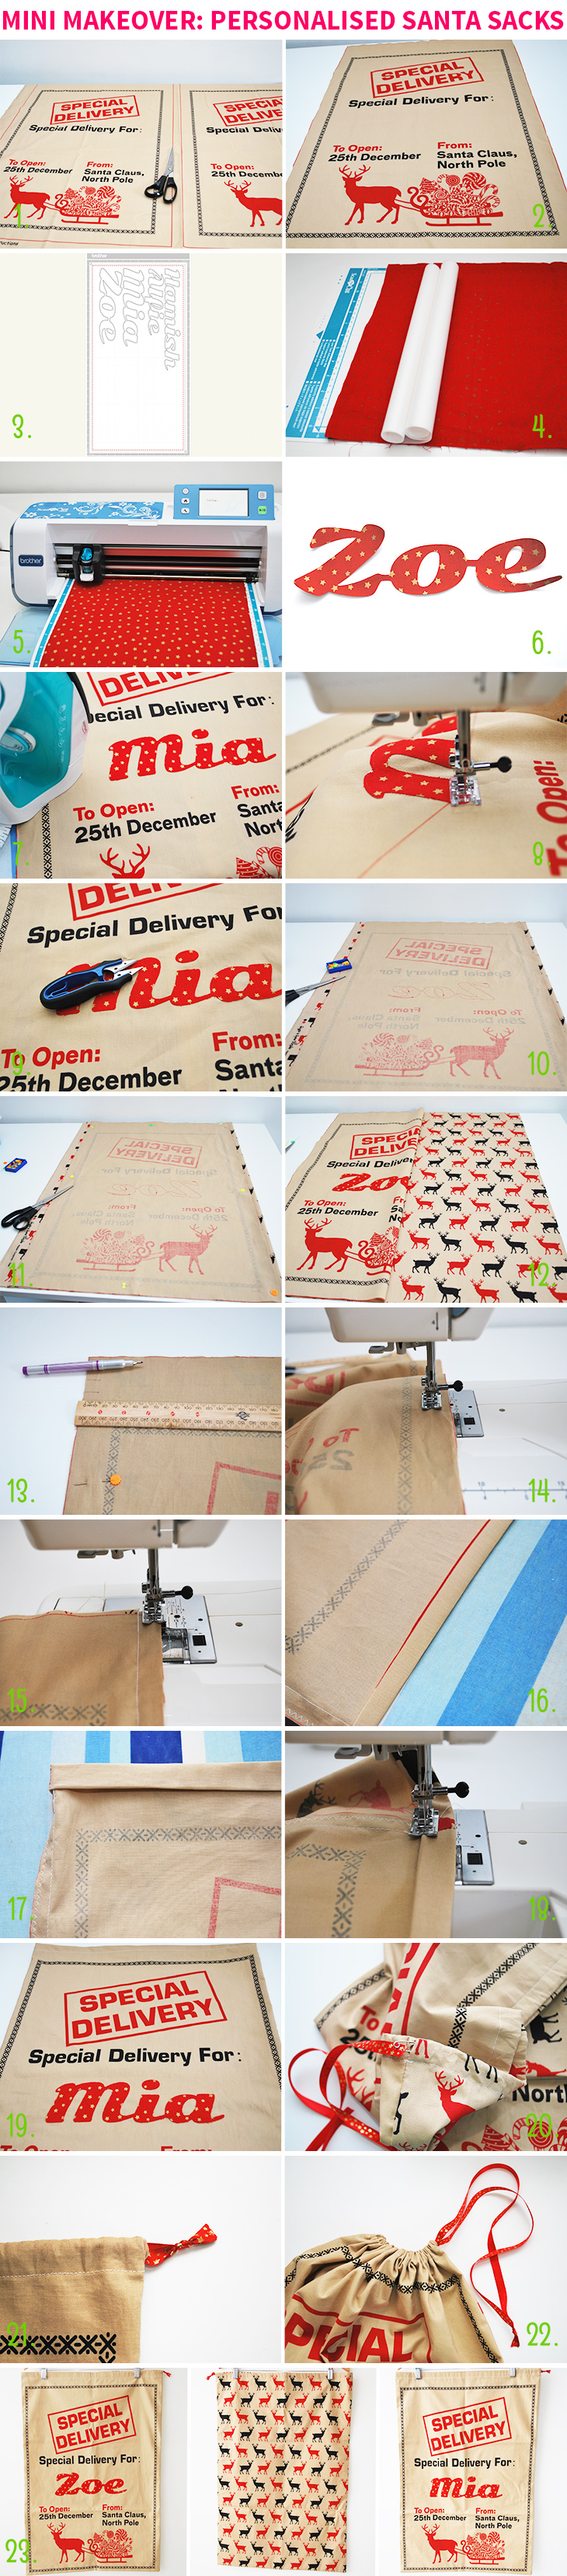
- Starting with the Deer Sack panel, cut out what will be the two fronts of the Santa Sacks around the marked line. This includes the seam allowance of 1.5cm. If you are making more than one pair, cut out as many as you need. This tutorial shows the making of Mia and Zoe’s Santa Sacks, but I created all 4 at the same time
- Iron your sack fronts so they are ready for the names and leave to one side
- Now it’s time design the names you will be adding. For this I used Photoshop to edit the font I chose so that all the letters joined for ease of sewing and then put them in the Scan N Cut Software as shown so that they could be cut by the machine. If you don’t have a cutting machine, create your names on a paper template and print. You can do this in Word or Canva or Photoshop.
- Now it’s time to take the Red and Gold Stars fabric and iron it flat. Then I placed it on the cutting mat so that it was cut to the size of the mat. Then I ironed on the Iron-On Transfer Sheet, following the iron-on instructions and left the protective backing on before attaching it to the mat right side up
- Next, it’s time to cut out your names. I loaded the mat and then made sure the settings were correct for both the mat and the cutting depth for the type of fabric. Then set it to cut. Peel the names off carefully when it is complete. If you are hand cutting, use your template and cut out your letters with the iron-on transfer sheet on the back
- Now the names are all cut and ready to be ironed on
- Take your front sack piece once again and lay it on the ironing board so the empty space under the “Special Delivery For:” is in the middle. Then peel off the protective backing of the name and place it so that it’s centred in that space. Also line up any dots that might be over an i or j. Once you’re happy with the placement, place some baking paper over the top and iron over the top so that the name is now stuck to the front piece
- Now it’s time to sew the names down so that they never fall off. With red thread and a small straight stitch (and a clear foot), stitch around the letters from start, all the way around and back to the beginning. Don’t forget any dots over i or j and also the inside of any letters like an a or d, etc. Snip off any excess threads
- With the snips again, snip off any excess fabric that might be sticking up like loose thread around the edges of the stitching to neaten
- Now take the reindeer backing fabric and fold it widthways so that the reindeer are horns up on both sides of the fold and lay flat. Then lay the front piece on the reindeer fabric face down and line it up so the back reindeer will be as straight as possible. Flatten out any creases of bumps
- Now pin the three pieces of fabric (the two reindeer backing pieces and the front piece) together and cut around the edges of the front piece so the back pieces are the same size as the front piece. Then iron the back pieces
- Now lay out one of the back reindeer pieces face up and place one of the front deer panel pieces face down on top of it and line them up. Then pin them with the sharp end pointing outwards for ease of removal when sewing
- Then on the top right corner measure 1.5 cm in and 3 cm down and mark with a line using the erasable fabric pen. 1.5 cm below that line, mark another 1.5cm line as shown. This is where the drawstring will go
- Now with a regular foot, white thread and a straight stitch, sew a 1.5cm (the 5/8″ line if your machine is in inches) seam allowance starting from the top right side and follow around to the lower of the two lines in the previous step. Back stitch at that line and then (leaving the 1.5cm gap) restart the stitch from the higher line (also back stitching to that line and stitch to the end (as the instructions on the panel recommend)
- Now switch your machine to a zigzag stitch and using the 1/8″ marker on your machine, stitch around the edge of the bag to give it neater seams. Stop when you get to that lower line and don’t continue for the top 3cm as you will press that open in the next step
- Now press that seam open where the 3cm line is on the top left of the bag so that you can’t see the stitching. Then fold the raw top edge down over it by 1cm and press. Repeat pressing the 1cm down right around the sack’s top edge
- Once that is complete, then fold over again but this time make it 2cm and press all around the bag so you’ve made a casing for the drawstring
- Now it’s time to top stitch the pressed top edge down. I followed the 6/8″ (2 cm) line on my machine from one edge around and back to the start
- Now it’s time to turn the sack in the right way. Push the bottom corners so they are right angles (I do this with a large wooden knitting needle, but it can also be done with the clean lid of a bic pen). It’s nearly ready!!
- Cut your ribbon to size. I used approximately 1.25 metres for each sack of the 10mm red with gold stars ribbon. Using the safety pin, fold a small amount of the ribbon over on itself at the end and attach to the pin for easy threading. Then start threading (with the patterned side of the ribbon facing out) from front around to the back
- Pull the safety pin out once it’s been all the way around and even the ribbon up so the ends sticking out are the same length. Then Pull slightly on the ribbon so that the sack’s top starts to gather so you have more ribbon available so you can tie a knot near the end of the ribbon. The using the scissors, neaten the ends. Open the sack completely to see it open. I deliberately left the drawstring short whilst the sack is open so it is less likely to catch on something
- Then carefully pull the drawstring so the Santa Sack closes and your Santa Sacks are ready!
- Now they are ready for Christmas morning! When they are filled, tie them with a bow to keep the drawstring closed.
Thoughts on the project:
This was a big project, but a super fun one to create! I really love how they turned out. The beauty of them is that they can be used year after year and can become part of the magic of Christmas. I love that there will be wee ones spotting these under the tree come Christmas morning this year and I hope that they all enjoy them! There’s nothing quite like having something with your name on it, when you are a kid!
I really enjoyed making this project and testing out the Scan N Cut for cutting fabric. It did a great job and I really love how the font turned out. The name adds more work to the project that would otherwise be quite quick, but it’s that extra detail that makes it special!
Are Santa Sacks part of your Christmas Tradition? Would you try making one like this?
If you do try this, I’d love to see a photo or hear about how it went! Tweet me your pics at: @danniellecresp or instagram me at: @dannielle with the hashtag: #styleforahappyhome
*Note: This post is not sponsored by Spotlight, though we do work together on some projects. This time I purchased my items from there and wanted to share where I got them so you can find them easily too. The two Deer fabrics are by Sugar & Spice Textiles. As always I only share what I think you’ll love too. x D
Wow! You have done a brilliant job on these. I love them! I don’t think I would be crafty enough to make them look so good. You could sell these Dannielle.
Thanks, so much Karin! That’s so lovely of you to say!
Where can you buy that lovely fabric please. Your bags are so cute
Hi Teresa, It can be purchased at Spotlight if you are in Australia. If not, I recommend searching for Deer Sack Panel by Sugar and Spice Textiles. Best of luck!