Today I wanted to share with you a way for you to test out a furniture move around a room of your choice (or your home if you’re feeling really ambitious) without a) hurting your back and b) realising that it doesn’t fit and having to move it all back again. It’s not a super complex idea, but it’s one you might not have thought of. It might not be the official way to do it, but it gives us home organisers a chance ;)

What you’ll need:
- Notepad and pen for collecting the information you ned
- Measurements of your room in width and length choose a gauge – ie. cm, in, mm – that you’re most comfortable with
- Measurements of the furniture that will take up floor space
- Measurements of the doors and windows and the swing that these may have into the room
- A scale that you’ll work to I will be doing 5cm=50cm (so that I can scale all my items by moving the decimal point left once – this works on an A1 size page)
- Computer with a program (like Photoshop) that allows you to create shapes of certain widths and lengths OR
- A sketch pad, pencil, eraser, scissors and ruler if you’d prefer to do it manually PLUS extra bits of paper for cutting out shapes
- Your Mini Makeover Essentials including time
Start by getting all your measurements for the room and the furniture that’s either in it, or you’d like to put in it, and write the width and length on your notepad. Don’t worry about the height as this floorplan is a birds eye view. Write each on a separate line, and create a column on the page that will allow you to write the measurements again, this time at the scaled values. ie Desk 125cm x 75cm | scaled: 12.5cm x 7.5cm

How to create it with a computer program like Photoshop:
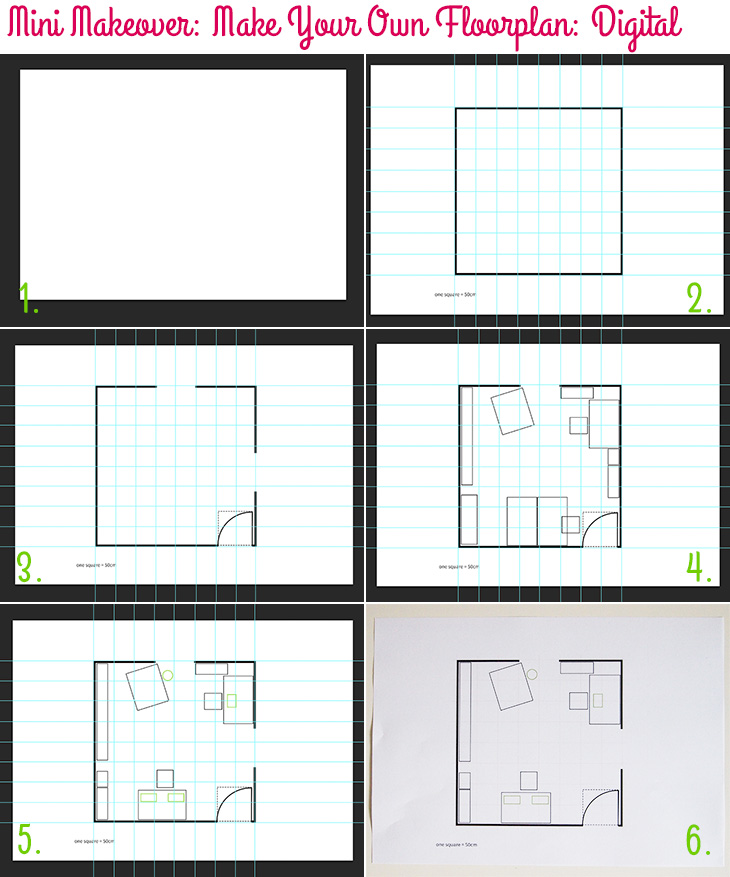
- Open Photoshop (or similar) and choose a new paper size to work with. I chose A1 as my room, scaled, would fit with extra space – it can be reduced to A4 for printing later if I wanted to. It’s better to start big and reduce later, as it’s a lot harder to go the other way.
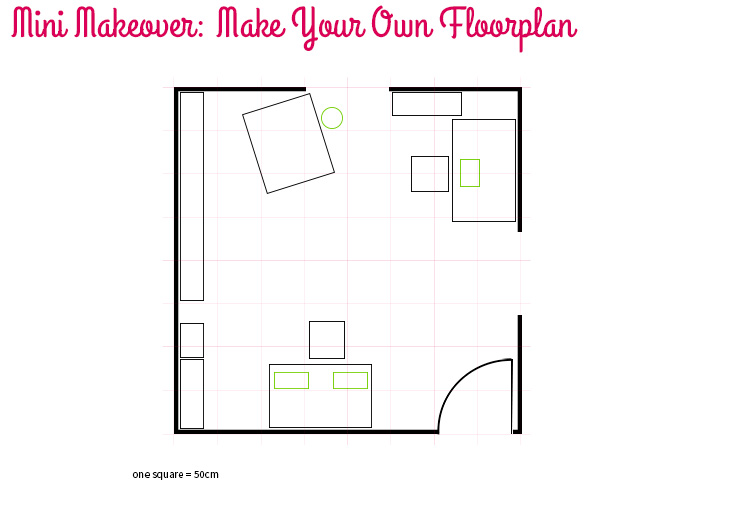
- If you have layer options like PS does, create a new layer for your room’s outer walls I chose to make mine a thick black so you can see that it’s a wall. Create guides View > New Guide in PS (and elements) that match your scale – mine are 5cm apart. from where you would like to put your left wall and top wall and add your walls with the Rectangle tool (on Stroke, no fill) from the top left corner of your guides to the bottom right (my example room is 4m x 4m (400cm x 400cm))
- With new layers (where possible) create the gaps for the doors and windows. You can add the swing of the door with a semi circle if you’re confident, or you could add a dashed rectangle (or a plain one in a different colour if you don’t have that feature) to illustrate where you can’t place your furniture. I use a white line with the door and window dimensions to show the gaps
- Now you can create your pieces of furniture using the rectangle tool or the ellipse tool for circles – giving each one a different layer so you can move it around individually later. Label your layers if possible so that you know which layer is which. Some versions of PS (like CS6) allow you to add the dimensions in the width and height bar at the top and you can simply click on the page to drop your shape on the page. You can rotate them as you like to see where they fit!
- Once you’ve got your furniture in place, you could add any smaller items like sewing machines, computers etc, on to (or next to) the furniture to see how they sit from a birds eye view. Do these in a different colour so you can see the difference easily. This is particularly helpful if you’re using measurements for furniture you haven’t bought yet and want to make certain is right for the job.
- If you like you can also add in labels or notes on the plan as to what is which item for printing and print it. Be sure to save often so you don’t lose it, and I recommend making a copy before reducing it to A4 for printing so you can change it again later in the full size.

How to create it with a pencil and paper:
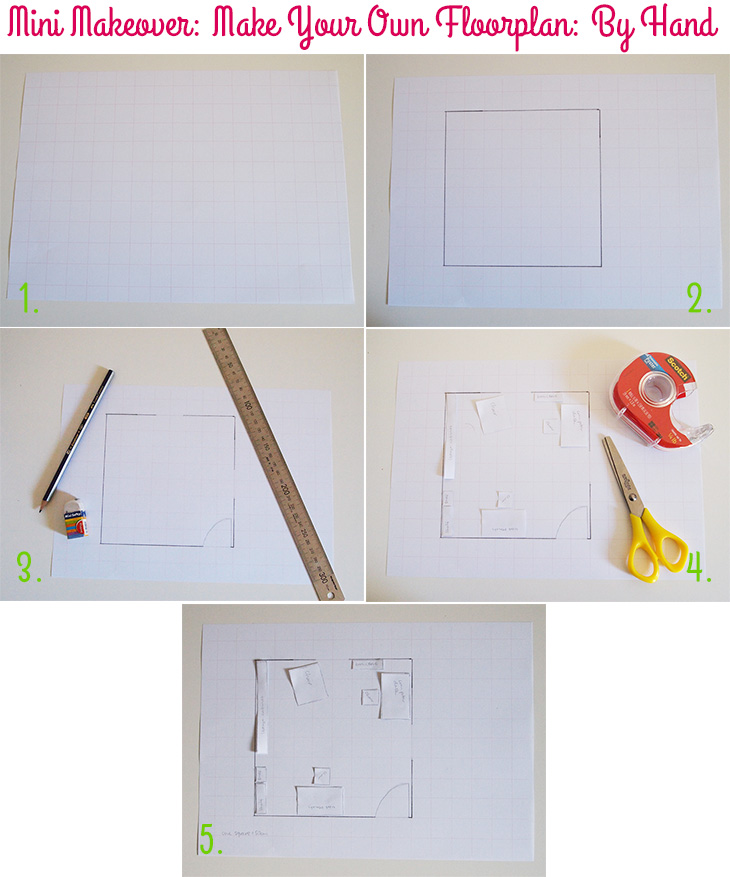
- Choose a scale that will work with your piece of paper and note it on the bottom left corner and draw some guide lines in a light pencil (or use grid paper if you have it)
- Draw your walls in a thick pencil or a colour of your choice and erase where the window and door gaps should be. In another colour (or pencil thickness) mark the open door and the swing in a semi circle
- Use a separate piece of paper to draw the shapes of your furniture from a birds eye view, mark in pen what each item is inside the lines – cut them out with scissors and place them on the piece of paper with the floor plan – you could use different coloured paper for items you own vs items you want to buy so you can see if they would fit
- Move them around the plan until you’re happy with how they look and fit and then secure with some removable double sided tape or blutack (so you can change your mind again later)
- If you like, you can write notes around the side and make a scan or photocopy in case any of the pieces were to move or fall off or just keep in a safe place or plastic slip
Once you’re happy with the new floor plan and have made sure it will all fit (assuming that you got your scale correct), you can then work out when you’re going to make the change and give your room the look you’ve been waiting for! Whilst you’re doing that, you might also like to give it a clean out and only put what you need and love back in the room!
Notes: I made my chairs square based on the widest parts and used finished measurements from the ikea website for items that I don’t own. The interior design teacher recommended that you try to leave ~75cm between items that you need to walk in front of for proper walking space. That’s 1.5 of my squares.
Do you do something like this when you’re looking at rearranging a room? I’d love to hear how you do it!
If you do try this, I’d love to see a photo or hear about how it went! Tweet me your pics at: @danniellecresp or instagram me at: @dannielle with the hashtag: #styleaminimakeover
I am a floorplan addict. I think I have one for everywhere I’ve ever lived or worked!
That’s so awesome, Sarah! So organised! :)
I move on average once a year, and when I find myself stuck in once house/room/apartment for longer than 12 months I get the itch to rearrange everything to make it feel like moving.
In my family, mum came up with an easy way to create floor plans on the computer using Microsoft Publisher, because the boxes were really easy to create in a specific size and you could move elements easily without having to worry about layers in photoshop. You can also group elements easily and add text labels so you don’t confuse the desk with the dresser. It wasn’t as pretty as your photoshop floor plan, but it did the job, time and time again!
Oh Microsoft Publisher sounds like a great idea! I don’t have that on my computer, but thanks for sharing. Sounds like a very clever way to do it! Thanks, Zoe! :)